¶ How to Solve the Problem of Not Being Able to Engrave Metal?
-
Material Confirmation:
Please ensure that the metal material used is appropriate, and avoid using untreated aluminum. As a highly reflective material, aluminum may not be suitable for some laser processing processes. -
Laser Head Focus Calibration:
Please carefully check whether the focus of the laser head has been correctly adjusted. The accuracy of the focus is crucial for the quality and precision of laser processing. -
Software Configuration File Check:
Please confirm whether the software has successfully imported the required configuration file. Correct importation of the configuration file is a prerequisite for ensuring the normal operation of the laser equipment. -
Power Setting Review:
If the configuration file has been imported, please further check whether the power setting has been set to the maximum value, that is, 1000. The correct power setting is very critical for achieving the best laser processing effect.
¶ How to Solve the Problem of Not Being Able to Engrave Wood or Cardboard?
-
Material Confirmation:
Firstly, please confirm whether the wood and cardboard materials you have selected are suitable for laser engraving. Different materials have varying adaptability to laser engraving, so understanding the material properties is the first step to ensure the engraving effect. -
Spot Check:
Before starting the engraving, please check whether the size of the laser spot meets the engraving requirements. The size of the spot directly affects the precision and detail of the engraving. -
Software Parameter Adjustment:
Please carefully check and adjust the speed and engraving power settings in the software to ensure they are at the appropriate level. Reasonable speed and power settings are crucial for achieving high-quality engraving results. -
Laser Head and Chip Inspection:
If problems are encountered during the engraving process, such as the inability to engrave cardboard, it may be necessary to inspect the attenuation of the laser head or whether the internal chip is damaged. These factors can affect the quality and effect of the laser engraving.
¶ How to Solve the Issue of the Laser Head Not Emitting Light?
-
Laser Head Connection Inspection:
- Please first check whether the wiring of the laser head is loose or incorrectly connected.
- If you find that the cable is loose or improperly connected, please reconnect it immediately to ensure the normal operation of the laser head.
-
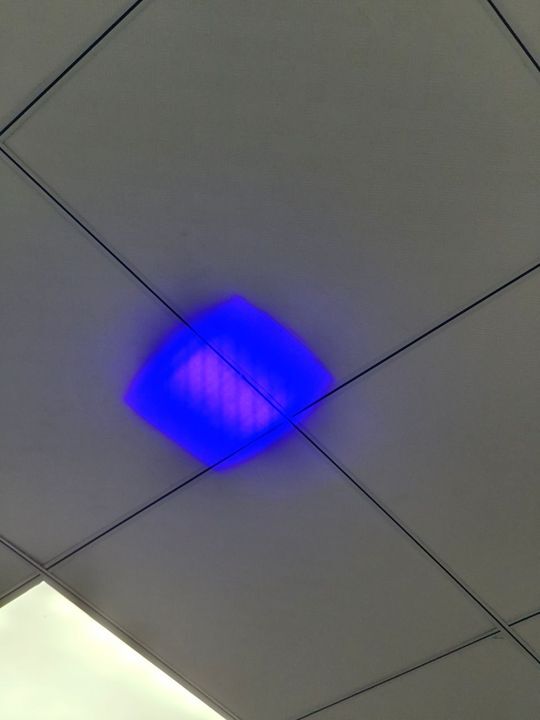
Laser Head and Fan Function Check:
- After starting the machine, observe whether the fan on the laser head is rotating normally.
- At the same time, check whether the signal light on the laser head lights up when the laser is turned on (the signal light color may be blue or green depending on the model).
- If the fan is rotating and the signal light is on, but the laser head is not emitting laser light, this may indicate that there is a problem with the laser head and it needs to be replaced.
- Additionally, if the fan of the laser head does not rotate, but the power supply from the mainboard port is normal, then the problem may lie in the wiring or the laser head itself, which requires further inspection or replacement.
¶ The second type
First step
You can use a multimeter to test whether there is 12V (or 24V) power supply output and 5V information output when the laser terminal of the laser head is turned on and the strongest function is turned on (as shown below).


¶ Here’s what happens
1,Can normally measure the voltage, but the laser head does not light, this time you can try to take off the fan line of the laser head to see if it can be light, if it can be a short circuit of the fan, if not, it is the damage of the laser head
2, the two voltages can not be measured, this time to open the motherboard box, the laser head of the terminal line in the 5V out, connect it to the fan often open to see if it can light up (this time to pay attention to safety, if you can work the laser is directly open the most intense) as shown below, If it still does not work, it is necessary to test whether the interface of the laser line has power supply when the laser is turned on, if it does, the laser head is damaged or the line is short circuit (Make the above test steps into videos or photos and submit them to technical support for quick and convenient solution).


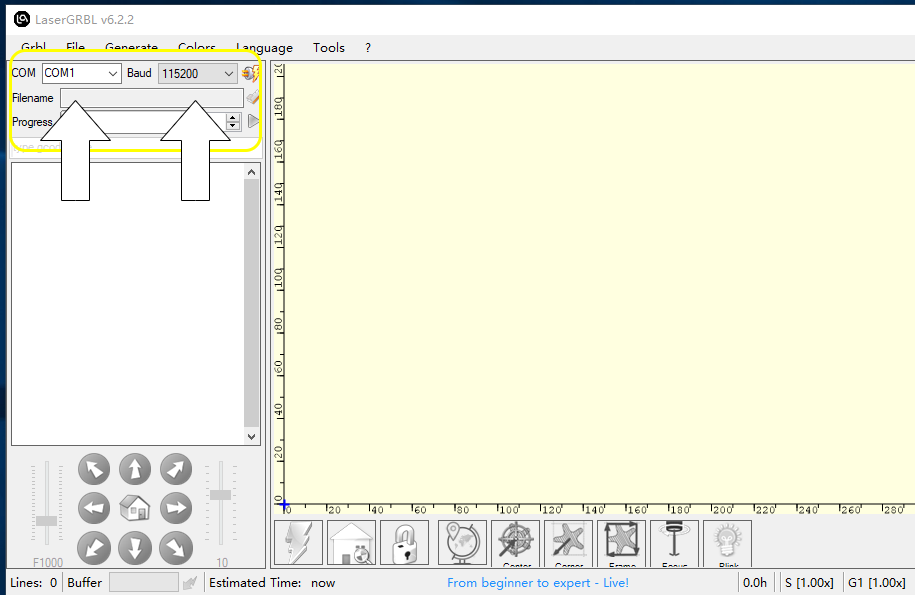
¶ How to Deal with the Machine Not Connecting to the Computer?
-
Power On Check:
- Ensure that the laser engraving machine is powered on and that the fan of the laser module is rotating to confirm that the machine is working properly.
-
USB Connection Confirmation:
- Please confirm that the USB cable is correctly connected to the machine’s interface.
-
Computer Recognition Check:
- Check if your computer can recognize the machine’s COM port signal. If necessary, try using another USB port on the computer.
-
Driver Installation:
- If no new COM port was detected in the previous step, you may need to install the CH340 driver. You can obtain this driver from the TF card files or install the CH340 driver through the lasergrbl tool.
-
Baud Rate Setting:
- Set the correct baud rate in the software, usually 115200.
-
Port Selection:
- Select the correct COM port in the software. If you are unsure, try each available COM port.
-
Connection Operation:
- Click the “Connect” button in the software to establish communication with the machine.
-
Troubleshooting:
- If you still cannot connect after the above steps, restart your computer and repeat steps 5 to 7 without opening any other software. This helps to rule out the possibility of software conflicts.
-
Firmware Update:
- If all steps have been tried and it still fails, and the software displays a prompt message on the left side of the dialog box, you may need to update the machine’s firmware. After updating the firmware, repeat the above steps.
|
¶ How to Deal with the Motor Not Working?
-
Connection Confirmation:
- Ensure that the laser engraving machine has been successfully connected to the laserGRBL software on the computer. If the connection is not successful, you will not be able to control the motor’s operation.
-
Motor Cable Inspection:
- Check whether the motor cables have been correctly installed. If unsure, it is recommended to try reinstalling the cables.
-
Control Box Motor Cable Swap:
- If there are other motors that work normally, you can open the control box and locate the main control board, then try swapping the motor cables inside the control box.
- If the motor still does not work properly after the swap, this may indicate that there is an issue with the cables. Please notify us, and we will send you replacement cables.
-
Cable Sequence Adjustment:
- If the motor vibrates but does not move, it may be a problem with the cable sequence. You can use a tool with a pointed end to try swapping the order of the two middle wires.
-
Cable Order and Motor Direction Adjustment:
- After swapping the cable order, if the motor direction is incorrect, you can try swapping the order of the two adjacent wires on the left.
-
Main Control Board Driver Inspection:
- If, after completing all the checks in step 3, the originally normal motor also stops working, it may be that the driver on the main control board is damaged. Please notify us in time, and we will send you a replacement driver.
-
Problem Reporting:
- When reporting a problem to us, it is best to provide a video explanation, which will help us more accurately identify the problem and provide the corresponding replacement parts.
|
¶ How to Deal with the X-axis Not Being Parallel (Tilted)?
-
Motor Function Test:
- First, conduct a functional test on the motors on both sides. Disconnect the wiring of one side motor and use the software to control the Y-axis to move twice to confirm whether the motor can work properly.
-
Eliminate Motor Issues:
- If the test results indicate that there is no problem with the motor, then please loosen the fixing screws on both sides of the X-axis guide rail.
-
Sled and Guide Rail Inspection:
- Check whether the wheels of the left and right sleds are in close contact with the aluminum guide rail and operate smoothly without obvious shaking.
- If the wheels are not in contact or there is shaking, use a wrench to adjust the hexagonal column to ensure that the sled wheels are in close contact with the guide rail.
-
Sled Positioning and Fixation:
- Align the left and right sleds on the aluminum rail with the same scale markings.
- Tighten the screws again to fix the sleds and ensure their positions on the guide rail are accurate.
-
Synchronous Belt Tension Adjustment:
- Finally, adjust the synchronous belts on both sides to ensure they have similar tension to guarantee the synchronization and stability of the machine’s operation.
¶ How to Deal with Distorted or Irregular Non-Closed Engraving Lines?
-
Adjustment of Pulleys and Tracks:
- Use a wrench to slightly adjust the hexagonal column of the pulleys to ensure they are tightly attached to the tracks, moving smoothly without shaking.
- After adjustment, manually move the X and Y axes to ensure they can move smoothly on the tracks without any jamming.
-
Synchronous Belt Tension Setting:
- Adjust the synchronous belts of the X and Y axes to an appropriate pre-tension state, which helps maintain the synchronization and precision of the mechanical movement.
-
Laser Module Fixation:
- Check and ensure that the screws fixing the laser module are firmly tightened, with no looseness, to avoid unnecessary shaking during operation.
-
Motor Function Verification:
- To verify whether the motors on both sides of the Y-axis are working properly, you can first unplug the motor wire on one side, then use the software to control the movement of that axis for testing.
-
Operating Speed Adjustment:
- Appropriately reduce the operating speed of the machine, especially after fine operations or adjustments, to ensure the stability and safety of the processing process.
-
Wheel and Track Inspection:
- Regularly inspect the pulleys for signs of wear and check the tracks for any foreign objects, as these factors can affect the normal operation of the machine.
¶ How to Deal with Inability to Cut?
-
Material Identification:
- First and foremost, understanding the material of the item to be cut is crucial. Common cutting materials include plywood with a thickness of less than 3mm. Solid wood, acrylic plates, and other materials require low-speed cutting. Metal materials cannot be cut by a laser. (Refer to 1.png in the link)
-
Cleaning the Laser Module:
- After turning off the machine power, check whether the lens at the bottom of the laser module is dirty. Please gently wipe the laser lens with a cotton swab to ensure it is spotless. After cleaning, conduct a new engraving test to verify if the lens is clean (refer to whether the spot is normal). (Refer to 2.jpg in the link)
-
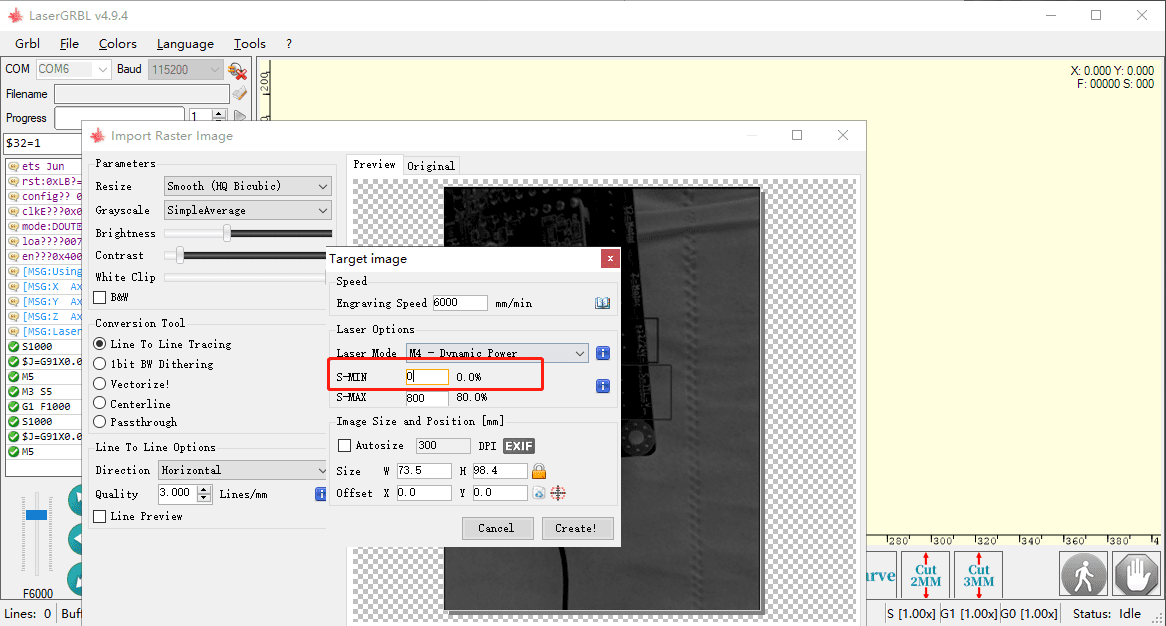
Software Settings Check:
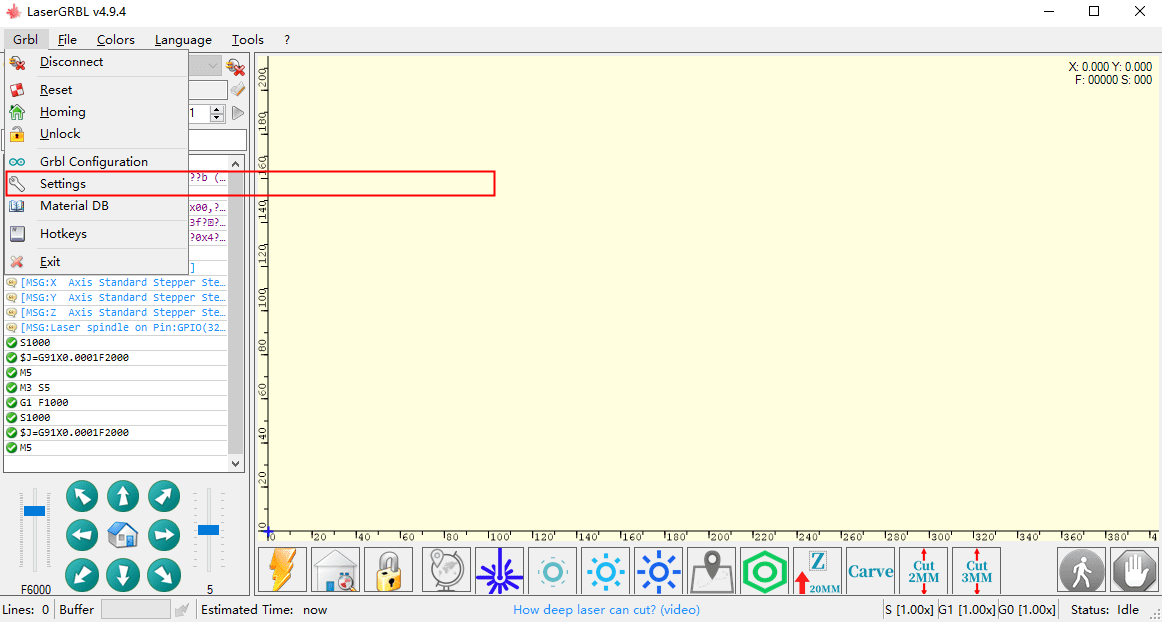
- When loading a design in the laserGRBL software, please check if the S setting value is sufficient. It is recommended to set the maximum S value to 1000, then perform the engraving test again. (Refer to 3.png in the link)
-
Power Setting:
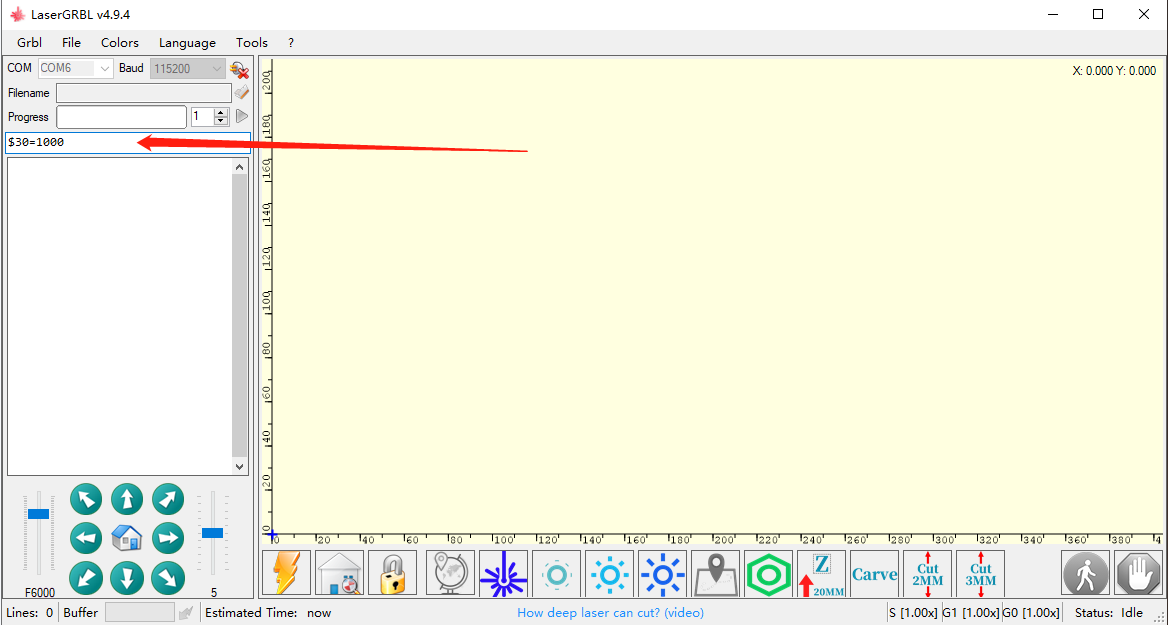
- In the “type gcode here” input box of the laserGRBL software, enter
$30=1000, then press the “Enter” key on the keyboard. This will set the default maximum power level of the laser to 1000. Afterward, please attempt the engraving test again. (Refer to 4.png in the link)
- In the “type gcode here” input box of the laserGRBL software, enter
-
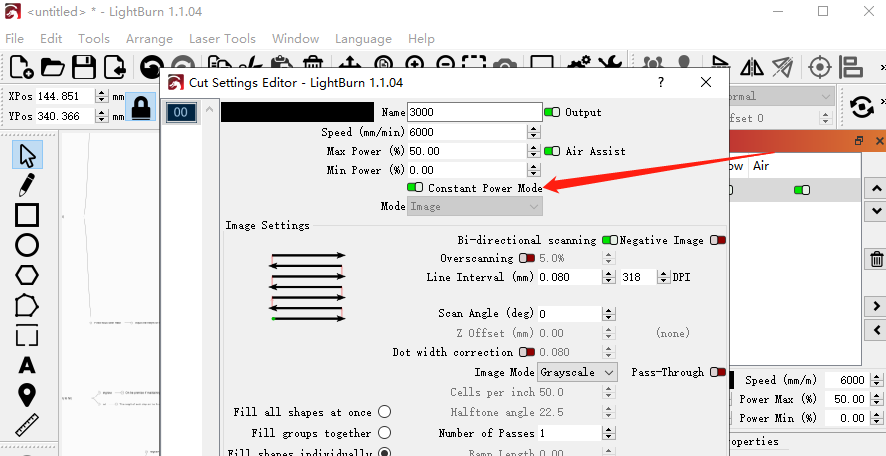
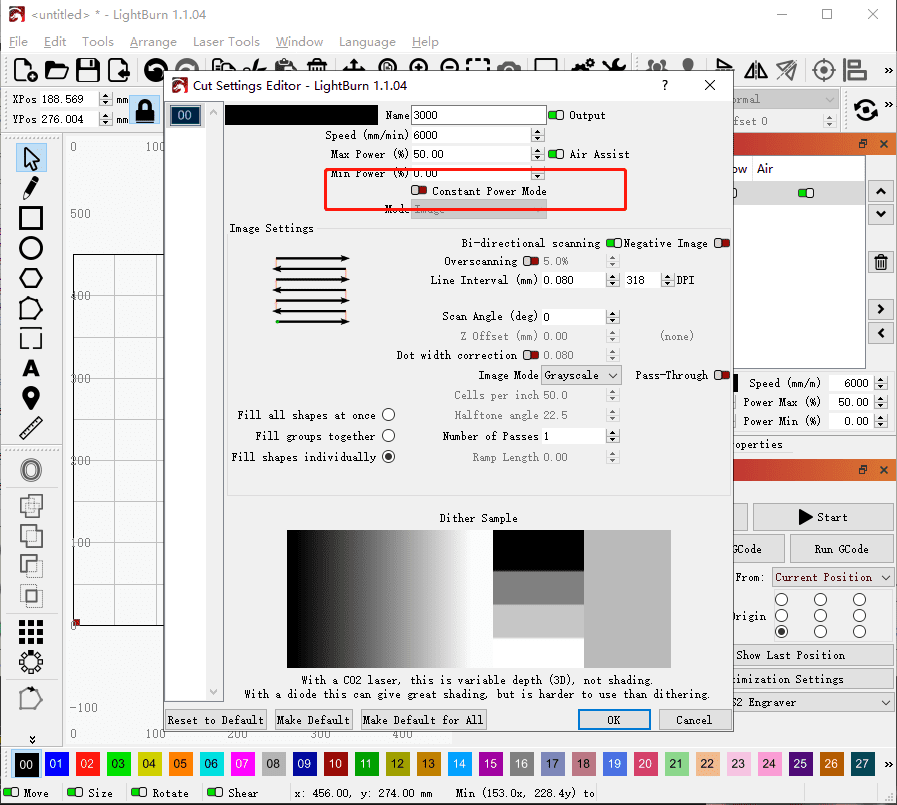
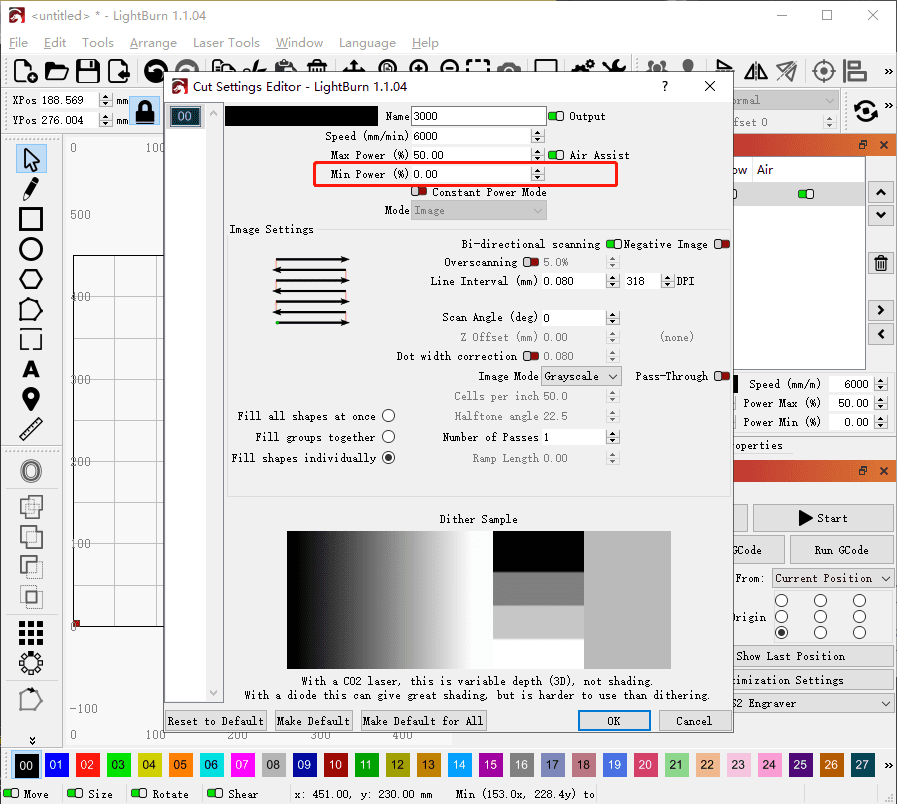
Cutting Mode Selection:
- When using the laserGRBL software to select M3 mode, the Lightburn software should enable “Constant Power Mode.” This is the mode suitable for cutting. (Refer to 5.1png and 5.2png in the link)
-
Speed Adjustment:
- Appropriately reduce the engraving speed and try different speed settings. Since the density of the same thickness plywood may vary, it is necessary to adjust the speed according to the actual situation.
-
Laser Head Focus Adjustment:
- Re-adjust the distance between the laser head and the object to be engraved according to the manual. Incorrect focusing may lead to the inability to cut. It is suggested to try different distances to see if there is any improvement. (Refer to the focusing method in the link)
-
Problem Diagnosis:
- If the above steps do not resolve the issue, please project the laser onto a wall in an unoccupied area and take a photo for the record. Also, wear laser protective goggles to ensure safety. In addition, please take a photo of your engraved item and send it to us so that we can better assist you in diagnosing the problem.

¶ How to Deal with Layering Errors in the Engraved Pattern?
- Adjust the hexagonal column of the pulley with a wrench to ensure the wheel conforms to the track, moving smoothly without shaking. Also, ensure the X and Y axes move without getting stuck.
- The synchronous belts of the X and Y axes should be adjusted to a pre-tensioned state.
- The screws that fix the laser module must be firmly secured and not wobble.
- Check whether the motors on both sides of the Y-axis are working properly; you can unplug the motor wire on one side for verification.
- Reduce the operating speed appropriately.
- Inspect whether the wheels show signs of wear or if there are any foreign objects in the tracks.
- If the above steps do not resolve the issue, refresh the machine’s firmware. (The machine models in the links may vary, but the operation method is the same)
- If the ambient temperature is high, use a fan for cooling around the mainboard.
¶ How to Deal with the Carving Process Being Interrupted Suddenly?
-
Change USB Port:
- If you encounter connection interruptions, try changing the USB port on your computer. A loose connection or insufficient voltage may lead to unstable connections.
-
USB Cable Management:
- Ensure that the USB cable is placed where it will not be touched or pulled. Improper cable management, such as accidentally pulling the USB cable, can also lead to connection interruptions.
-
Adjust Software Settings:
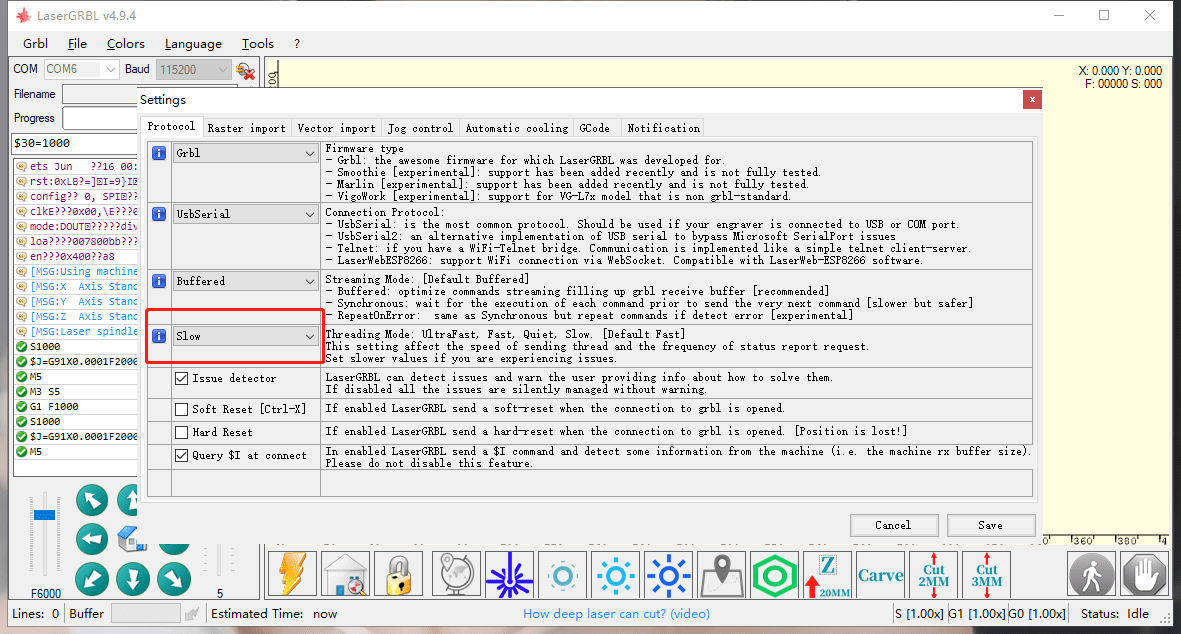
- In the laserGRBL software, check the “Threading Mode” settings and select a lower-speed mode to improve stability. (Refer to 3.1png and 3.2png in Link 1)
-
Update Machine Firmware:
- If the above steps do not resolve the issue, you may need to update the machine’s firmware. (Refer to the video in Link 2)
- Please note that although the machine firmware in the video may differ from your machine, the steps to update the firmware are consistent. Please contact us to obtain the firmware suitable for your machine.
¶ How to Deal with the Engraved Pattern Being Inverted?
-
Axis Movement Test:
- First, manually move the X and Y axes and carefully observe whether their movement directions are as expected.
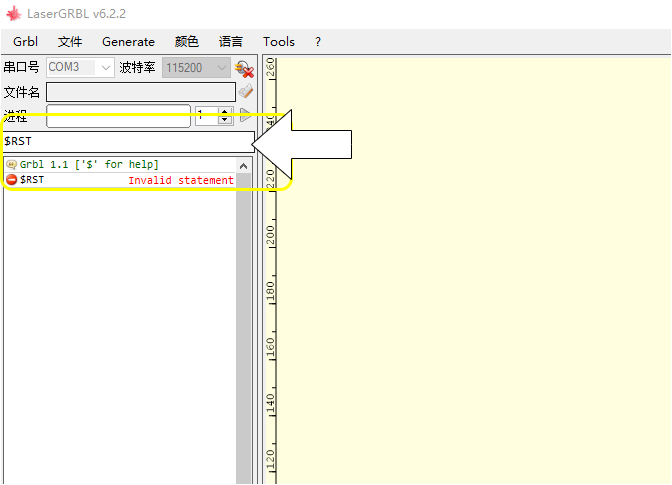
- If the movement direction is incorrect, open the LaserGRBL software, enter
$RSTin the “type gcode here” input box, and then press the “Enter” key on the keyboard. This will reset the machine to its default settings. Afterwards, please conduct movement and engraving tests again to verify if the problem has been resolved. (Refer to 1.png in Link 1)
-
Firmware Update:
- If the problem still persists after the above steps, you may need to update the machine’s firmware. (Refer to the video in Link 2)
- Please note that although the machine firmware shown in the attached video may differ from your machine, the steps to update the firmware are universal. Please contact us to obtain the firmware suitable for your machine model and follow the video guidance to update.
¶ How to Deal with the Engraved Pattern Edges Turning Black?
-
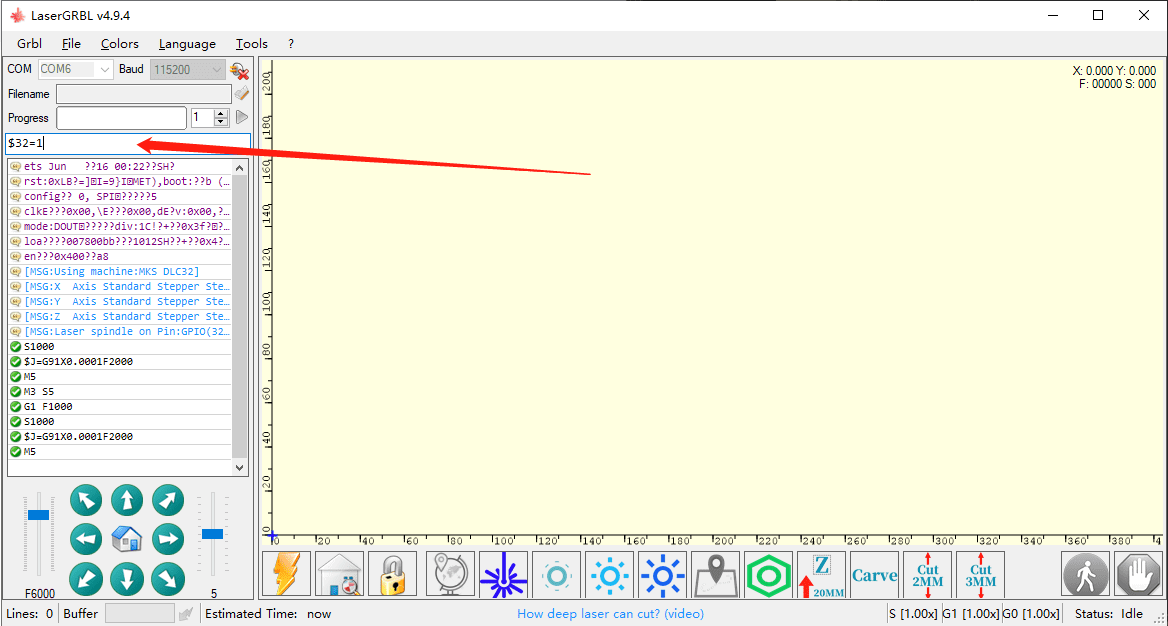
Enable Engraving Mode:
- In the LaserGRBL software’s “type gcode here” input box, enter
$32=1, then press the “Enter” key on the keyboard. This will enable the engraving mode, preparing for the upcoming engraving work. (Refer to 1.png in Link 1)
- In the LaserGRBL software’s “type gcode here” input box, enter
-
Select Engraving Mode:
- In the LaserGRBL software, select the M4 mode. Also, in the Lightburn software, make sure to turn off “Constant Power Mode”.
- The M4 mode is specifically designed for engraving and is more suitable for fine engraving work. (Refer to 2.png and 2.2png in Link 1)
-
Firmware Update:
- If the problem persists after following the above steps, you may need to update the machine’s firmware. (Refer to the video in Link 2)
- The attached video shows the general steps for updating the firmware, although the firmware for different machines may vary, the update process is similar.
- If your machine’s firmware is not included in the attachment, please contact us, and we will provide the firmware suitable for your machine.

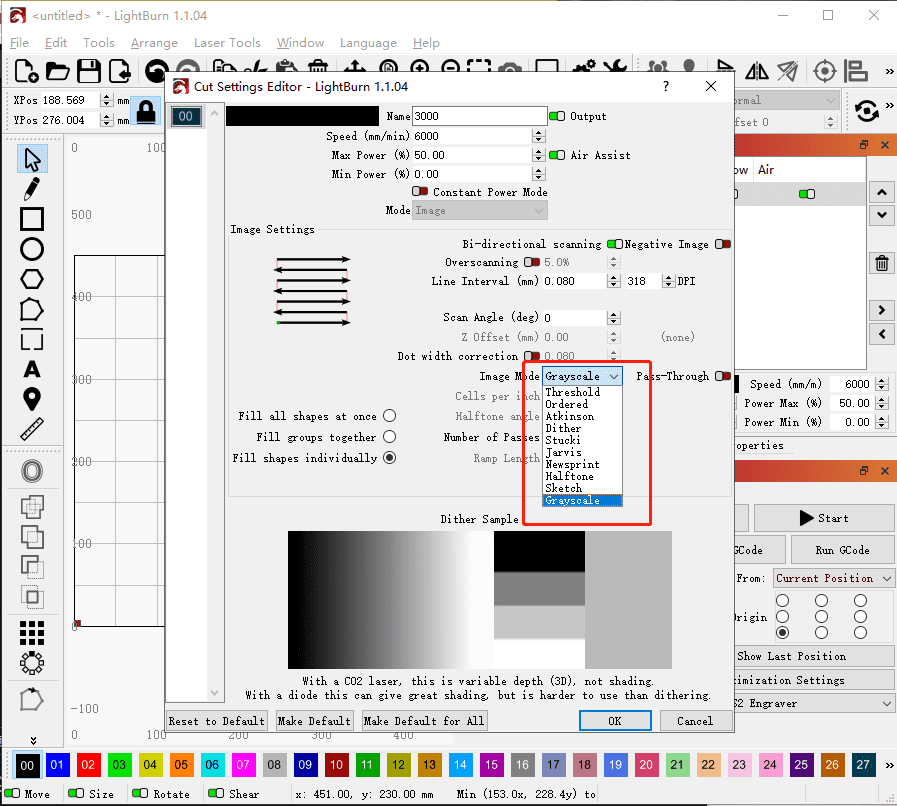
¶ How to Deal with the Inability to Achieve Grayscale Effects in Engraving?
-
Enable Engraving Mode:
- In the LaserGRBL software’s “type gcode here” input box, enter
$32=1, then press the “Enter” key on the keyboard. This will enable the engraving mode, preparing for the subsequent engraving tasks. (Refer to 1.png in the link)
- In the LaserGRBL software’s “type gcode here” input box, enter
-
Select Engraving Mode:
- In the laserGRBL software, choose the M4 mode. Also, in the Lightburn software, ensure to disable “Constant Power Mode”.
- The M4 mode is suitable for engraving as it offers finer control, making it ideal for engraving operations. (Refer to 2.png in the link)
-
Set Minimum Power:
- In both laserGRBL and Lightburn software, ensure that the minimum power S value does not exceed 10% to prevent over-engraving or material damage. (Refer to 3.png in the link)
-
Choose Grayscale Mode:
- In the Lightburn software, set the image mode to grayscale. Grayscale mode can help you control the engraving depth and power more precisely, leading to better engraving results. (Refer to 4.png in the link)
¶ How to Deal with the Machine Not Starting?
-
Check Power Connection:
- Ensure that the adapter or power cord is correctly connected and that the power indicator light is on, indicating that the machine has power.
-
Test Power Switch:
- Press the machine’s power switch repeatedly and observe if there are any changes or responses to determine if the machine can start normally.
-
Remove TF Memory Card:
- Try removing the TF memory card and then power on again to rule out any startup issues that the memory card might cause.
-
Disconnect Laser Module and Motor Cables:
- Unplug the cables of the laser module and all motors to disconnect them from the machine, then try to power on again.
- If the machine can start successfully, then reconnect the cables one by one and observe the machine’s response.
- If the machine shuts down again after plugging back a certain cable, this may indicate that there is an issue with the cable that was just reconnected.
-
Inspect the Control Box:
- Open the control box and check if the switch wires are securely connected, without any detachment or damage.
-
Adapter Replacement Test:
- If the above steps do not resolve the issue, try using another adapter of the same specification for a replacement test to determine if the problem is caused by the adapter.
¶ How to Deal with Incorrect Machine Movement Distance?
-
Connect the Machine:
- First, ensure that your computer has been successfully connected to the laser engraving machine.
-
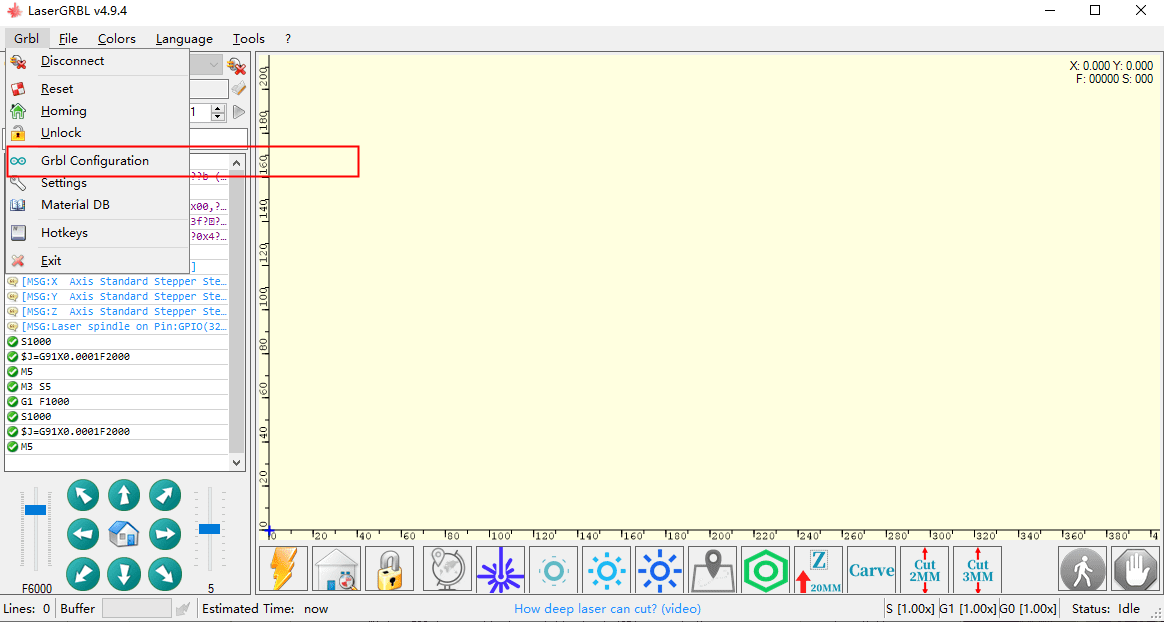
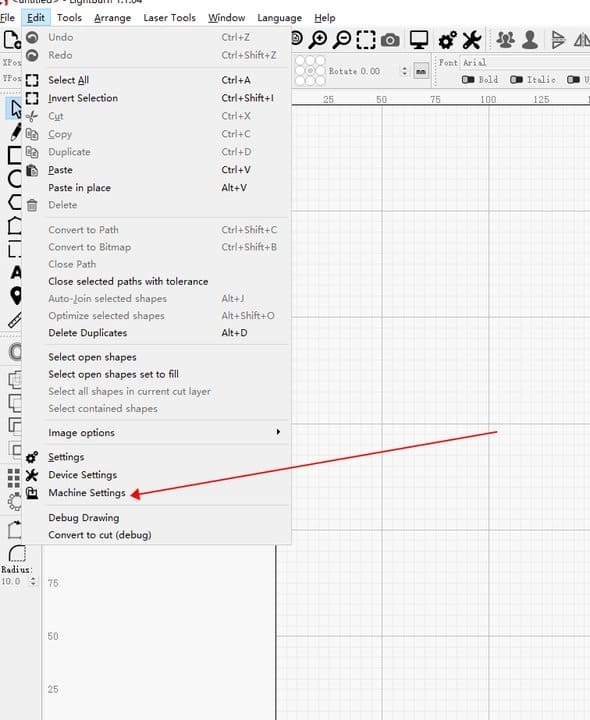
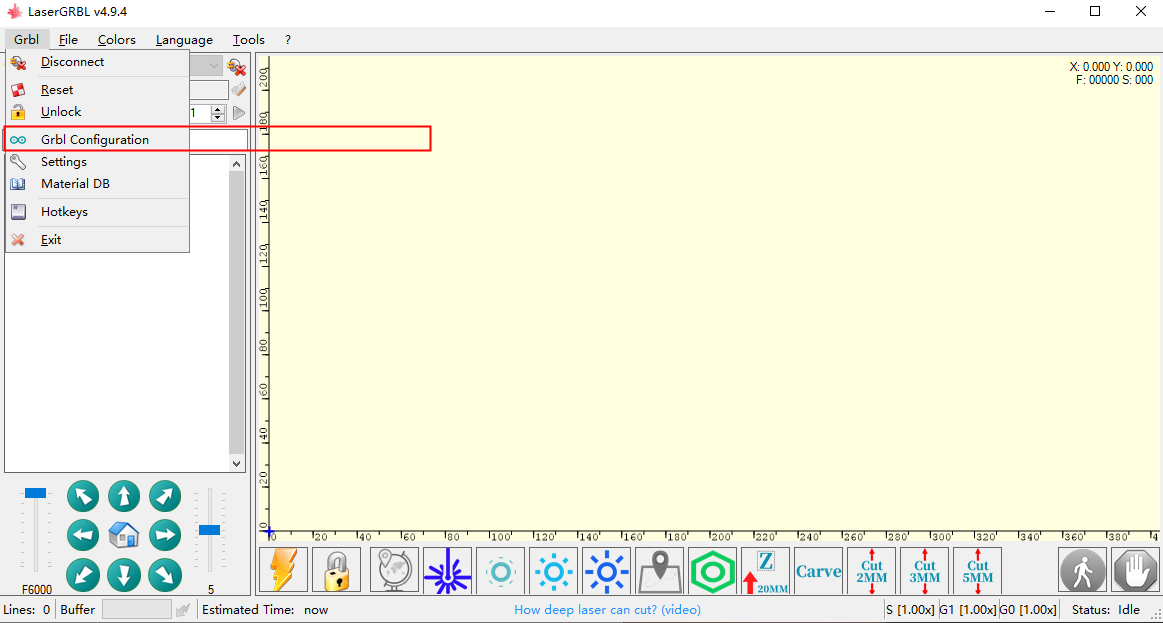
Access GRBL Configuration:
- In the lasergrbl software, click on the “GRBL” option, then select “GRBL Configuration” to access the machine’s configuration settings.
-
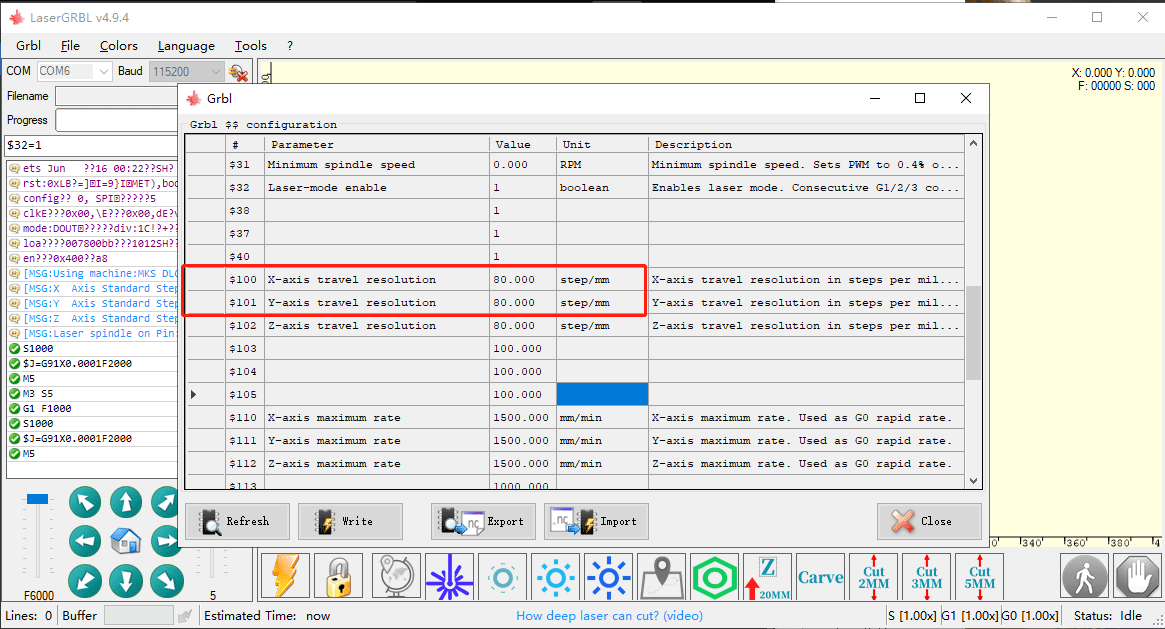
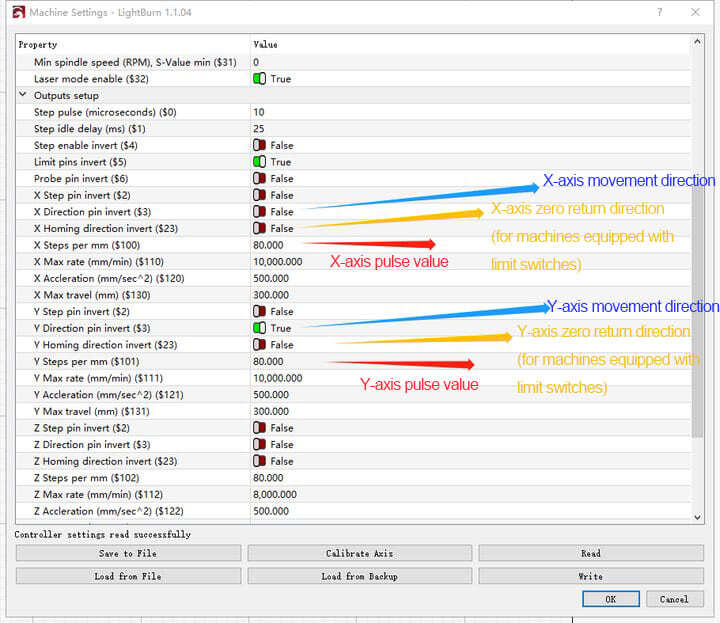
Adjust Speed Settings:
- In the configuration interface, locate the parameters
$100and$101. These parameters are typically used to set the machine’s axis movement speeds. - Change the values of both
$100and$101to80, which will adjust the speeds of the X and Y axes.
- In the configuration interface, locate the parameters
-
Save and Restart:
- After completing the parameter modifications, click the “Write” button to save the changes.
- Once the saving is complete, restart the machine for the settings to take effect.
-
LightBurn Software Settings:
- Connect to the machine in the LightBurn software and open the machine settings interface.
- Find the corresponding speed setting parameters in LightBurn and make the appropriate adjustments (for detailed steps and parameters, see Link 2).
- Adjust laserGRBL software Settings:
- Adjust LightBurn software Settings:
¶ How to Deal with the Machine Axis Moving in the Opposite Direction?
-
Connect the Machine:
- Ensure that the computer has been successfully connected to the laser engraving machine.
-
Access GRBL Configuration:
- In the lasergrbl software, click on the “GRBL” option, then select “GRBL Configuration” to enter the configuration interface.
-
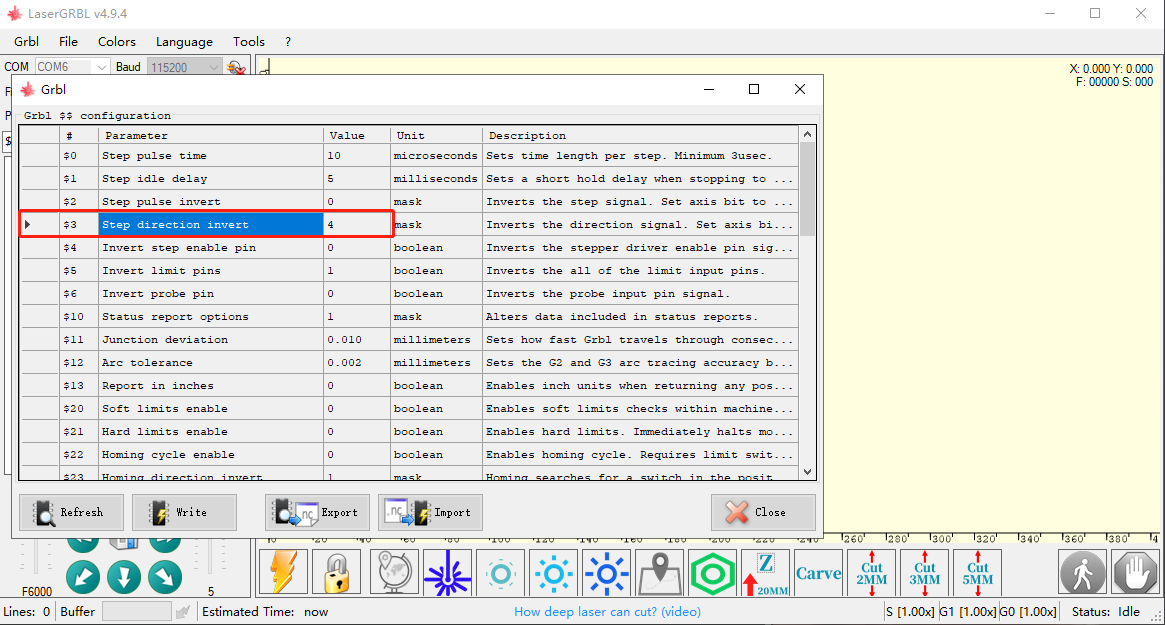
Adjust Motion Control Settings:
- In the configuration interface, locate the parameter
$3. This parameter controls the machine’s motion control mode. - Change the value of
$3to any of the options0,1,2, or3.
- In the configuration interface, locate the parameter
-
Save Settings and Restart:
- After modifying the parameter value, click “Write” to save the changes.
- Once the saving is complete, restart the machine to apply the new settings.
-
Test Axis Movement:
- Example operation process:
- Follow the steps above to set
$3to0, click “Write,” then restart the machine. - Connect the machine and use the lasergrbl software to move the X and Y axes, observing whether the movement direction is correct.
- If the direction is incorrect, modify the value of
$3to1again and retest the axis movement. - Continue to modify the value of
$3to2and3in sequence until the correct axis movement direction is found.
- Follow the steps above to set
- Example operation process:
-
LightBurn Software Settings:
- Connect the machine in the LightBurn software and open the machine settings interface.
- Find the corresponding parameter value according to the LightBurn interface and make the appropriate modifications (for details, see Link 2).
- Configure GRBL Settings in laserGRBL:
- Adjust LightBurn software Settings:
¶ How to Deal with Upload Failure When Using the APP?
-
Insert the TF Card:
- Ensure that the TF memory card is correctly inserted into the machine’s card slot and that the machine can read it successfully.
-
Signal Source Proximity:
- The machine should be close to the connected signal source to ensure signal strength. If it is an AP mode machine, please ignore this step.
-
Format the TF Card:
- If there are reading issues, format the TF memory card and then reinsert it into the machine.
- After formatting, use the APP to upload the program to the TF card again.
-
Restart the Machine:
- After completing the TF card operations, restart the machine and try connecting with the APP again.
-
Change the Mobile Device:
- If the problem persists, try using another mobile device to test and determine if the issue is related to a specific device.
-
Update the Firmware:
- If your machine was shipped before November 20, 2023, please check and update to the latest version of the firmware.
- The production batch number can be found on the outer box of the machine. If you need the latest firmware, please contact our business team to obtain it.
The attached video provides general guidance for updating the firmware. Please note that although the machine firmware in the video may differ from your machine, the basic steps for updating the firmware are consistent.
- If your machine’s firmware is not included in the attachment, please contact us, and we will provide the firmware suitable for your machine.
¶ How to Deal with Offline Carving Unable to Read SD Card Files?
- Format the SD card and try re-importing the files.
- Standardize the file naming on the card, try to use combinations of English letters or numbers, and avoid overly long names.
- Insert the SD card into a computer to check if it can read the content normally to determine if the card is damaged.
- Check if the SD card is of class 10 format.
- If the machine was shipped before November 20, 2023, please update to the latest firmware of the machine (the production batch number is on the outer box of the machine, and the latest firmware can be obtained by contacting the business).
Please disregard the differences in machine firmware in the attached video; the method of flashing the firmware is consistent. If your machine’s firmware is not included in the attachment, please contact us to provide it.