¶ Easel
¶ OEM Partner Computer Profile Settings
Easel and Easel Pro can connect and control the machine as long as you use a Grbl-based motion controller. Easel currently supports the following GRBL versions of third-party machines: Grbl 1.1h, Grbl 1.1g, Grbl 1.1f, Grbl 1.1e, Grbl 1.0c, Grbl 1.0b, Grbl 0.9j, Grbl 0.9i, Grbl 0.9g, Grbl 0.8c .
For more information about Grbl, check out this guide: > - Grbl - Overview and frequently asked questions
If you are not sure what type of motion controller you have, please contact your machine provider.
There are two ways to set up a new machine configuration file in Easel.
The first is that after creating an Easel account, you will be prompted to set up a new computer configuration file:

|
The second one comes from the Easel project:

|
After selecting the machine type, you can select the manufacturer and model of the machine for which you want to create the configuration file.

|
After entering machine details, click Confirm to continue with the machine configuration file settings. Easel will start writing machine configuration, or you will be prompted to download the Easel driver before continuing.
For more detailed instructions on downloading and installing the Easel driver, you can click this link: > - Download and install the Easel driver
After writing the machine configuration, Easel will pop up a page to test the machine’s wiring. On this page, you will be able to jog the machine along each axis to make sure everything is moving in the right direction. After confirming that everything is OK, click Continue.
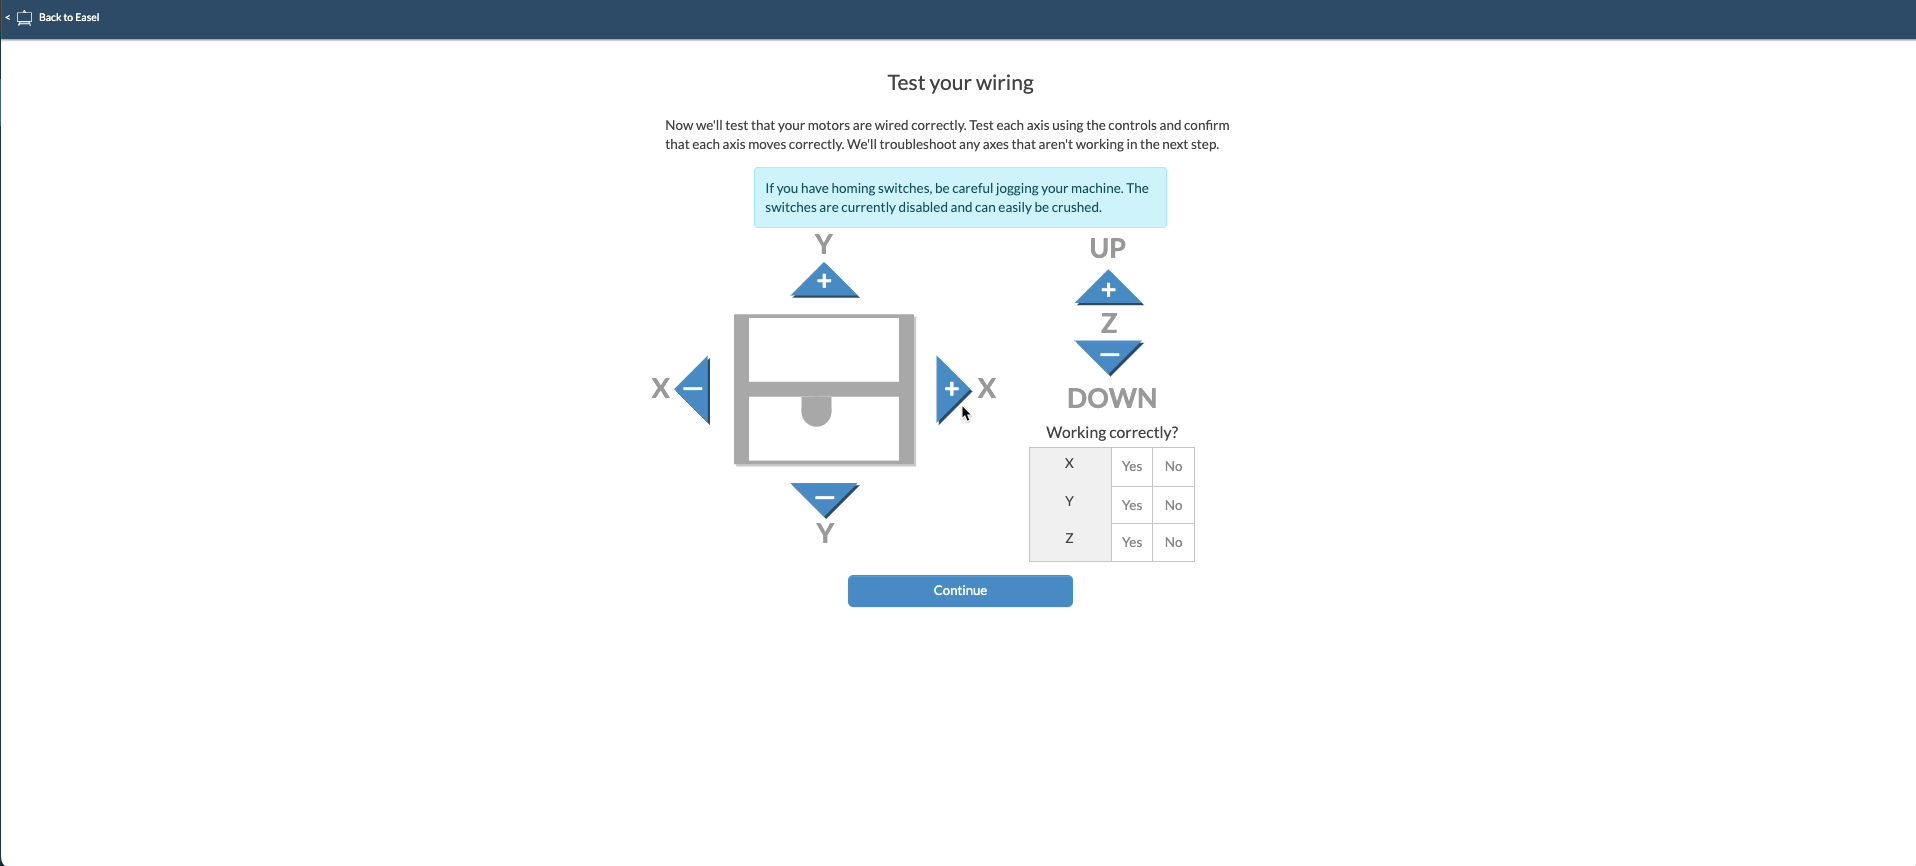
|
Helpful tip: If one of the machine axes jogging in the wrong direction, you can adjust the GRBL settings as follows:
After confirming that the machine is jogging in the correct direction, you will be taken to a page where you can select the spindle type and test it
You will see a drop-down menu with two spindle type options: automatic and manual. Automatic means that the spindle is energized through the machine’s controller. Manually means that the spindle is manually opened by the user, for example when using the router.
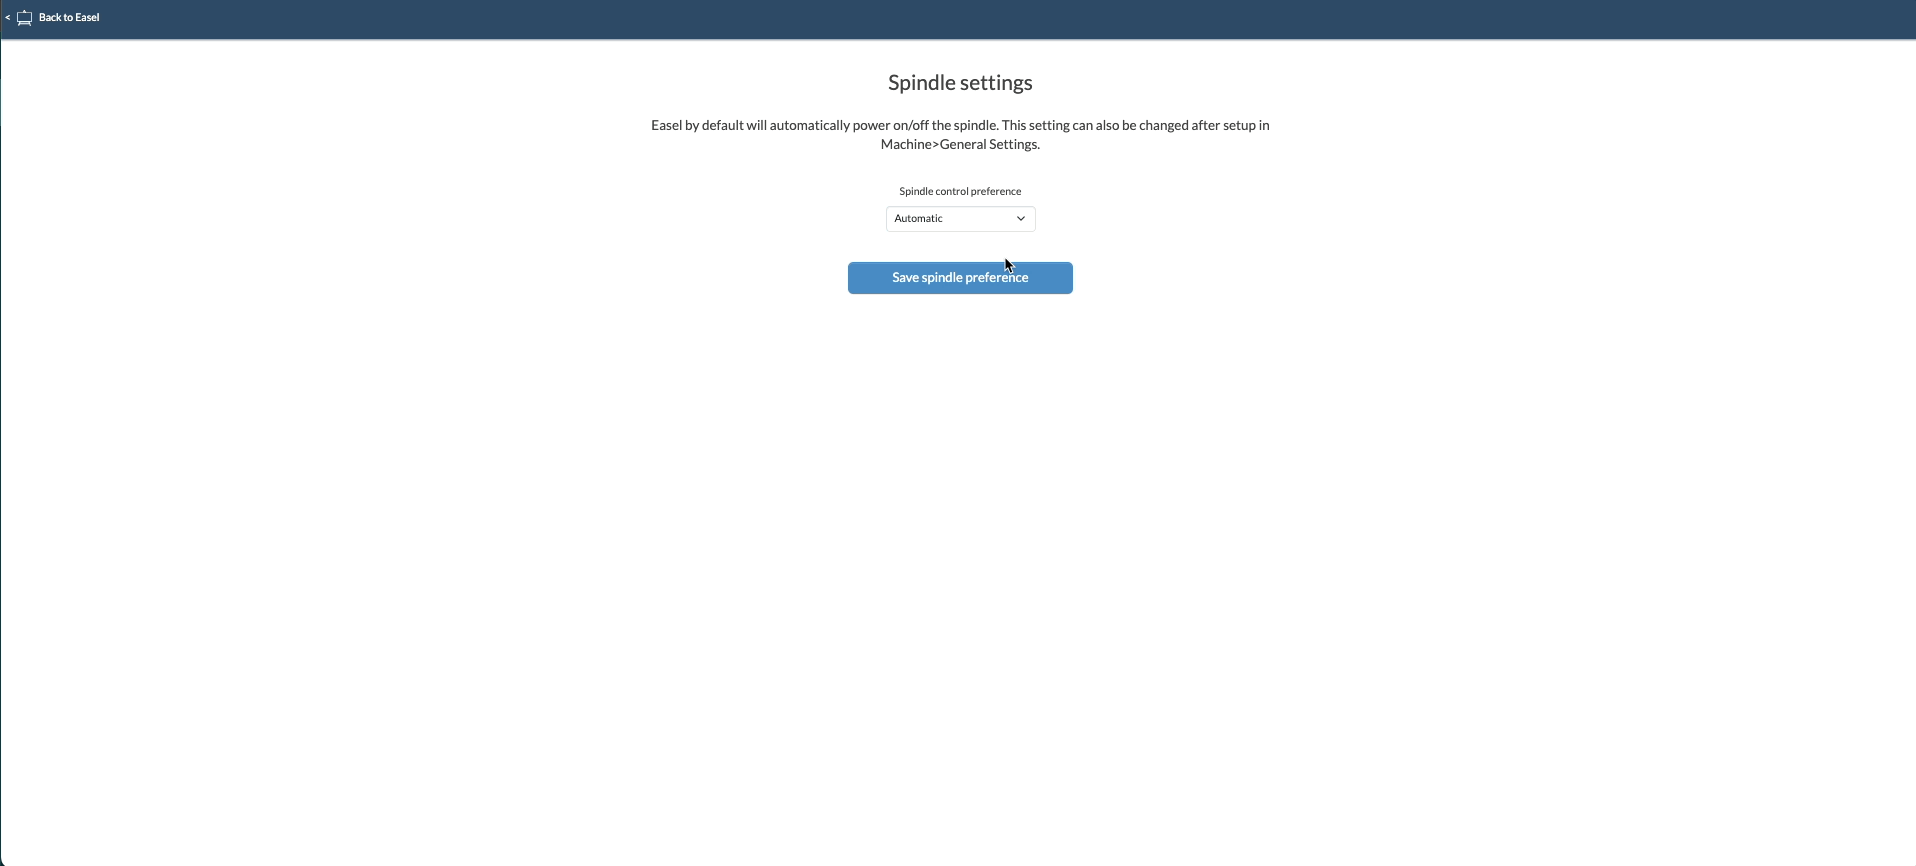
|
If Auto is selected, Easel will prompt you to test the spindle. Click the green “Open Spindle” button to activate the spindle. After confirming that the spindle is working properly, click the green button again to close the spindle. Then you can click Continue to set up
|
Helpful tip: If the spindle fails to start, you can follow the steps in this article to resolve the issue:
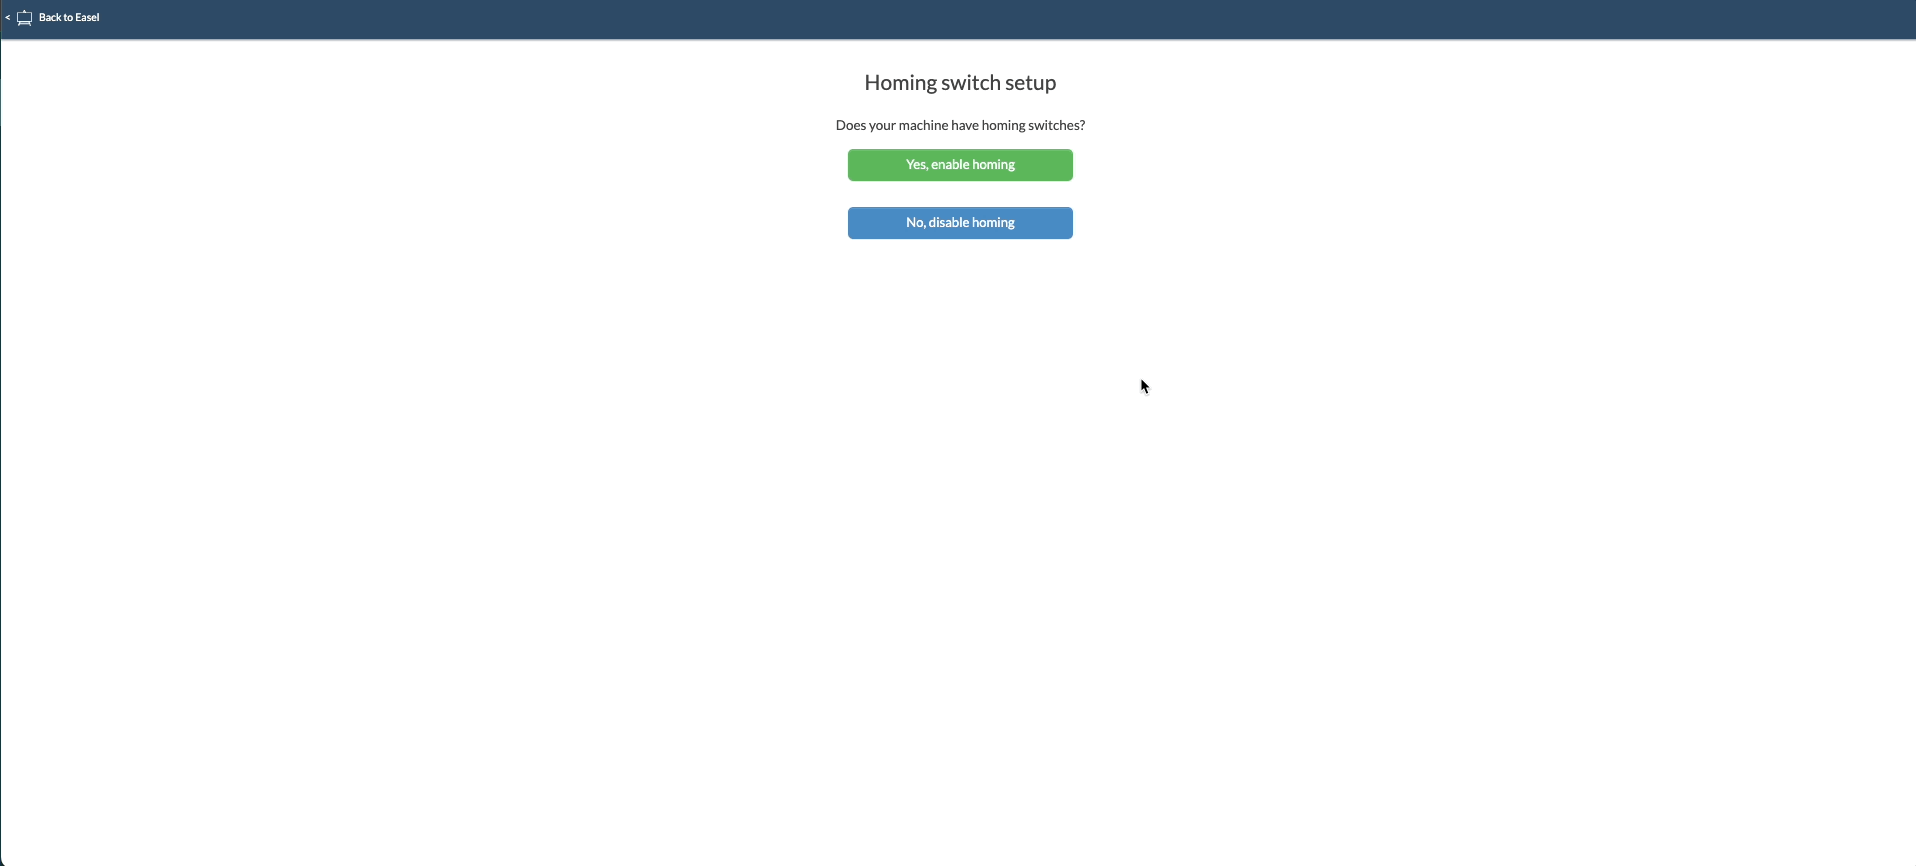
On the next page, Easel will ask you whether you want to enable or disable hosting. Each time Grbl is started, the homing loop is used to accurately and consistently establish known reference locations on your machine. This ensures that the machine always knows its exact location, providing reliable positioning between sessions.
When you click “Yes, Enable Homing”, you will be prompted to run the homing sequence. This process moves the machine to its initial position before continuing with the setup. If you click “No, disable hosting”, you will go to the next setup step page
|
Finally, Easel will ask you if you want to set up Z-Probe. The z-axis probe is an accessory that helps you set the z-axis working zero for the engraving. Easel knows the thickness of the brass disc and can determine how much the z-axis is lowered so that your drill bit can touch the material.
First, you will confirm whether you have a Z probe. If you click Yes, Easel will direct you to the Z-Probe settings.
You will be prompted to insert the wire into the bay, essentially asking you to connect the Z probe to the machine. After this is done, the circle will change to a green check mark.
Next, you will be instructed to attach the clip to the chuck. Remove the Z probe clip and secure it to the spindle chuck nut. After attaching the clip, click the blue “Clip is attached” button.
The final step will involve contacting the Z probe plate with the spindle chuck nut. This will complete the connection. You can then click the blue Continue button to enter the final settings screen.
If you do not have a Z probe, select No and you will be taken to the final settings screen

|
¶ The machine cannot be connected (OEM partner machine)
- Easel and Easel Pro will use open source GRBL firmwares connected to and works in conjunction with the machine, and the firmware is limited to Arduino-based controllers. Here we provide instructions for connecting to the OEM Partner GRBL machine: OEM partner machine profile Settings
Note: E asel currently supports GRBL versions of third-party machines as follows: Grbl 1.1h, Grbl 1.1g, Grbl 1.1f, Grbl 1.1e, Grbl 1.0c, Grbl 1.0b, Grbl 0.9j, Grbl 0.9i, Grbl 0.9g, Grbl 0.8c
To successfully connect from Easel to the machine, two components need to be in place and work properly:
Easel driver needs to be installed and run
The Easel driver needs to be able to open the connection to the device
If you cannot connect to Easel, clicking the blue Engraving button will indicate which steps you need to follow. Y You will see one of two messages:
Installing Easel Driver”→Step 1 Failed
We cannot find your machine automatically” → Step 2 failed
¶ 步骤 1:
Make sure the Easel driver is installed: : Download and install the new Easel driver
Windows users may need to install the FTDI driver:
:Install FTDI driver (Windows only) and make sure Select the correct COM port)。
Make sure your computer meets the Easel system requirements listed here:What are Easel’s system requirements?
¶ Step 2:
Make sure your machine is powered on and connected
- If your machine has an emergency stop button (e-stop), make sure your e-stop button is completely disengaged before seeking further help.
This is the most common question we have, so if you have connection issues, check your e-stop. This may vary by type of machine.
- Check whether your machine and computer are communicating. In Windows, check the COM port under Device Manager. In macOS, check the USB device under the system report.
Incorrect COM port selected (Windows only)
- Make sure the correct driver is installed. We recommend that Windows computers use the FTDI driver.
Install FTDI driver (Windows only)
Download and install the new Easel driver
If you still can’t connect, please contact your machine provider as this may be a hardware issue. You can also
contact others in the community forum: https: //discuss.inventables.com/c/3rd-party-machines/52
Inventables can only truly provide hardware support for machines we build and test ourselves.
¶ OEM The OEM machine is pausing (restrictions are enabled)
Please note that any mechanical or hardware-related issues require support from your machine provider. Make sure your machine is functioning properly before troubleshooting with Easel.Please note that you change the firmware at your own risk. We also recommend that you consult the manufacturer for instructions, as they know your machine best.
If you have successfully set up your machine but it stops moving almost immediately when you start the engraving, it may be that your machine has soft or hard limits enabled.
When hard limits are enabled and your machine is close to those limits, it goes into locked state and may require a full restart.
Soft limit is a safety feature that helps prevent your machine from traveling too far and beyond travel limits. It works by knowing the maximum stroke limit for each axis and the position of Grbl in the machine coordinates.
To resolve the stop issue, you can try to disable the soft or hard limit by changing the $20 (soft limit) or $21 (hard limit) value from the Machine Inspector console in Easel.
You can open the Machine Inspector by going to Machine > General Settings > Machine Inspector. In the console, you can disable hard limits by typing one of the following commands:
$20=0
$21=0
Press Enter. You should receive an “OK” message.
|
You can now exit the machine inspector and try engraving again.
For more information on GRBL settings, see this link: GRBL restriction configuration
¶ Non-Grbl Machine Setup (OEM Partner Machine)
Easel and Easel Pro can be connected to OEM partner machines as long as you use a Grbl-based motion controller. Easel and Easel Pro also generate G code compatible with certain non-GRBL machines. If you are using a GRBL motion controller, follow the following guidelines: OEM partner machine profile Settings
If your machine does not use a GRBL controller, or you do not want to install the Easel driver and allow Easel to control your machine, you can still set up the machine configuration file to generate gcodes from Easel and Easel Pro.
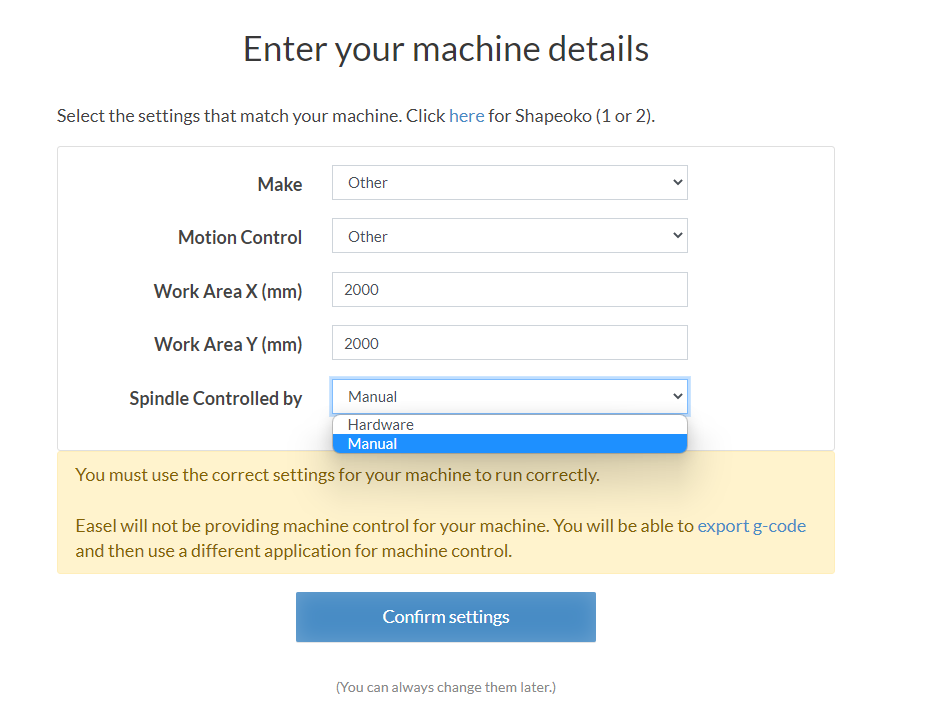
First, open an Easel project and go to machine > Set up new machine > Other (third-party machine)
Easel lists Grbl and non-grbl machines. If listed, follow these steps:
Select the appropriate machine type from the Brand drop-down menu.
Confirm machine selection.
On the next screen, select Edit existing machine or Set up new machine. (Note: Only Easel Pro users can set Multiple machine configuration files)
In the last step, select “Run Easel Project Introduction” or “Finish” to return to your Easel project.
If your machine is not listed and you do not want Easel to control your machine, select Other and follow the next steps.
1,Select “Other” as “Brand” from the drop-down menu.
2,Select other as “Motion Control”
3,Enter the working area of the machine. If you don’t know the work area, please consult the machine supplier. ,
4,Choose whether your spindle is controlled by the machine (hardware) or whether it is manually turned on/off.
5,On the next screen, select “Edit existing machine” or “Set new machine” (Note: Only Easel Pro users can set multiple machine profiles.)
6, In the last step, select “Run Easel Project Introduction” or “Finish” to return to your Easel project.
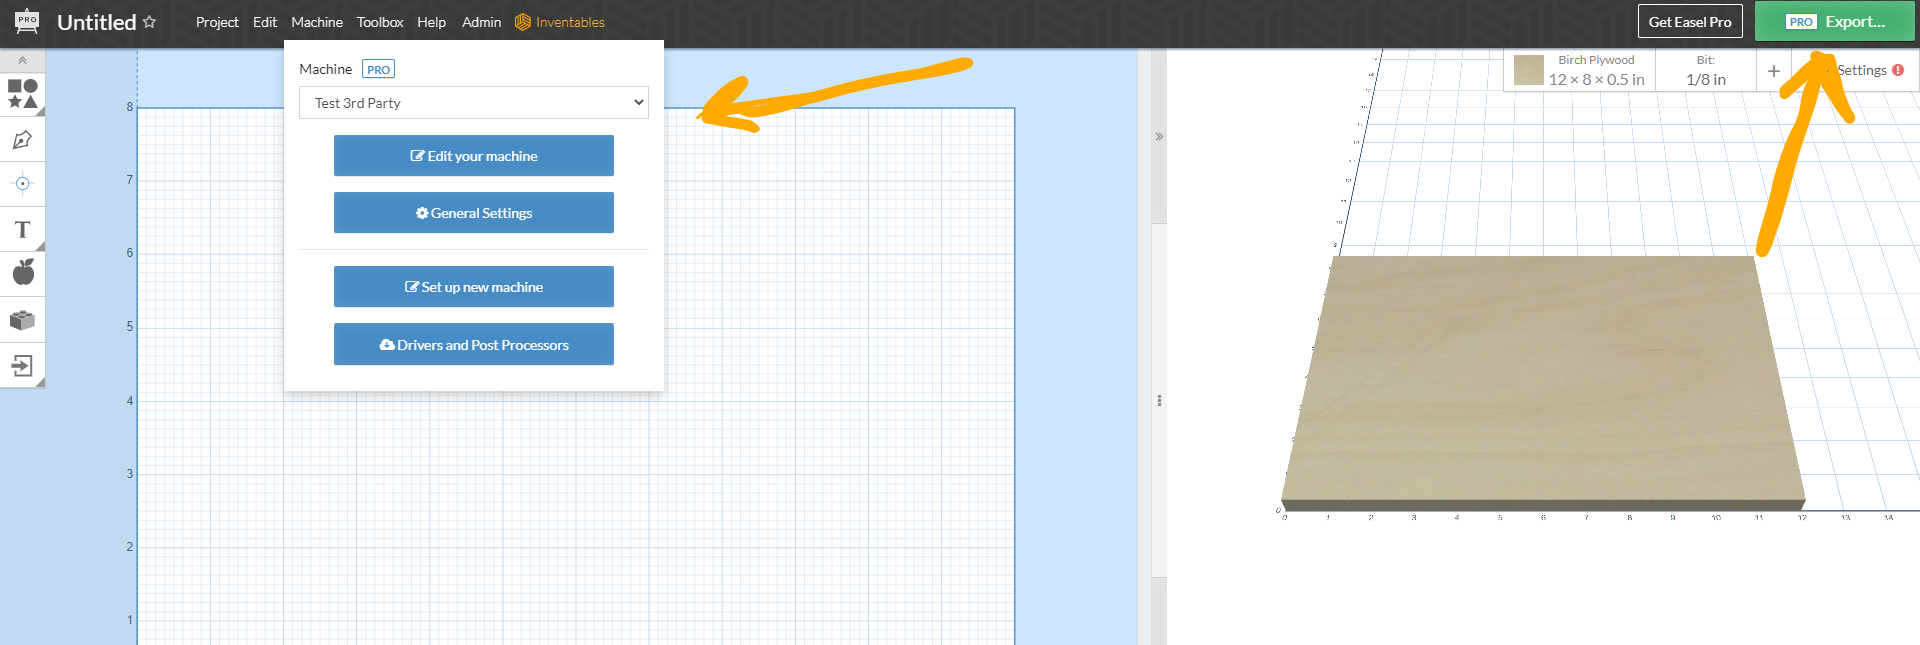
It should look like this: Once the machine is set up, open any Easel project.
|
You should now see a green “Export” button instead of the “Engraving” button:
|
¶ Engraving too small or too large (OEM partner machine)
If you are sculpting the wrong size or are sculpting deeper/shallower than expected, you can make sure the machine is assembled correctly first. Please refer to the manufacturer’s manual and support.
If there are still issues, you may need to adjust the step/mm firmware settings to ensure the axis moves accurately.Please note that you change the firmware at your own risk. We also recommend that you consult the manufacturer for instructions, as they know your machine best.
The first thing to try is to use Easel’s machine inspector for reset. Turn on the machine and connect to Easel. You can open the Machine Inspector by going to Machine > General Settings > Machine Inspector.
Scroll down to the console in the Machine Inspector and send this command:
$X
Press Enter and this will unlock your machine.
You can now send a reset command:
$RST=*
Press Enter. You should receive a message that says “OK”.
After resetting the firmware, you can try jogging the machine to make sure it moves the correct distance.
If this does not resolve the issue, we recommend contacting your machine manufacturer to get the correct firmware values and to make sure your machine is assembled correctly.
You can also try to calculate the step count/mm settings using the following link:
https://wiki.shapeoko.com/index.php/Grbl_Configuration#
https://github.com/gnea/grbl/wiki/Grbl-v1.1-Configuration#100-101-and-102--xyz-stepsmm
This article on the Community Forum explains how to calculate the steps/mm:
https://discuss.inventables.com/t/steps-mm-calibration/10705
¶ Spindle cannot start (OEM partner machine)
If your machine has automatic spindle control and the spindle cannot start, you need to enable it.
You can enable this setting by setting up the machine correctly. Go to Machine > Set up a new machine and select Other (third-party machine).
Follow the prompts in the walkthrough to select Automatic in the “Spindor Setting” step.

|
Easel will prompt you to test the spindle to make sure it works properly.
Continue to machine setup until it is finished. Now you should have configured the spindle to open before engraving.
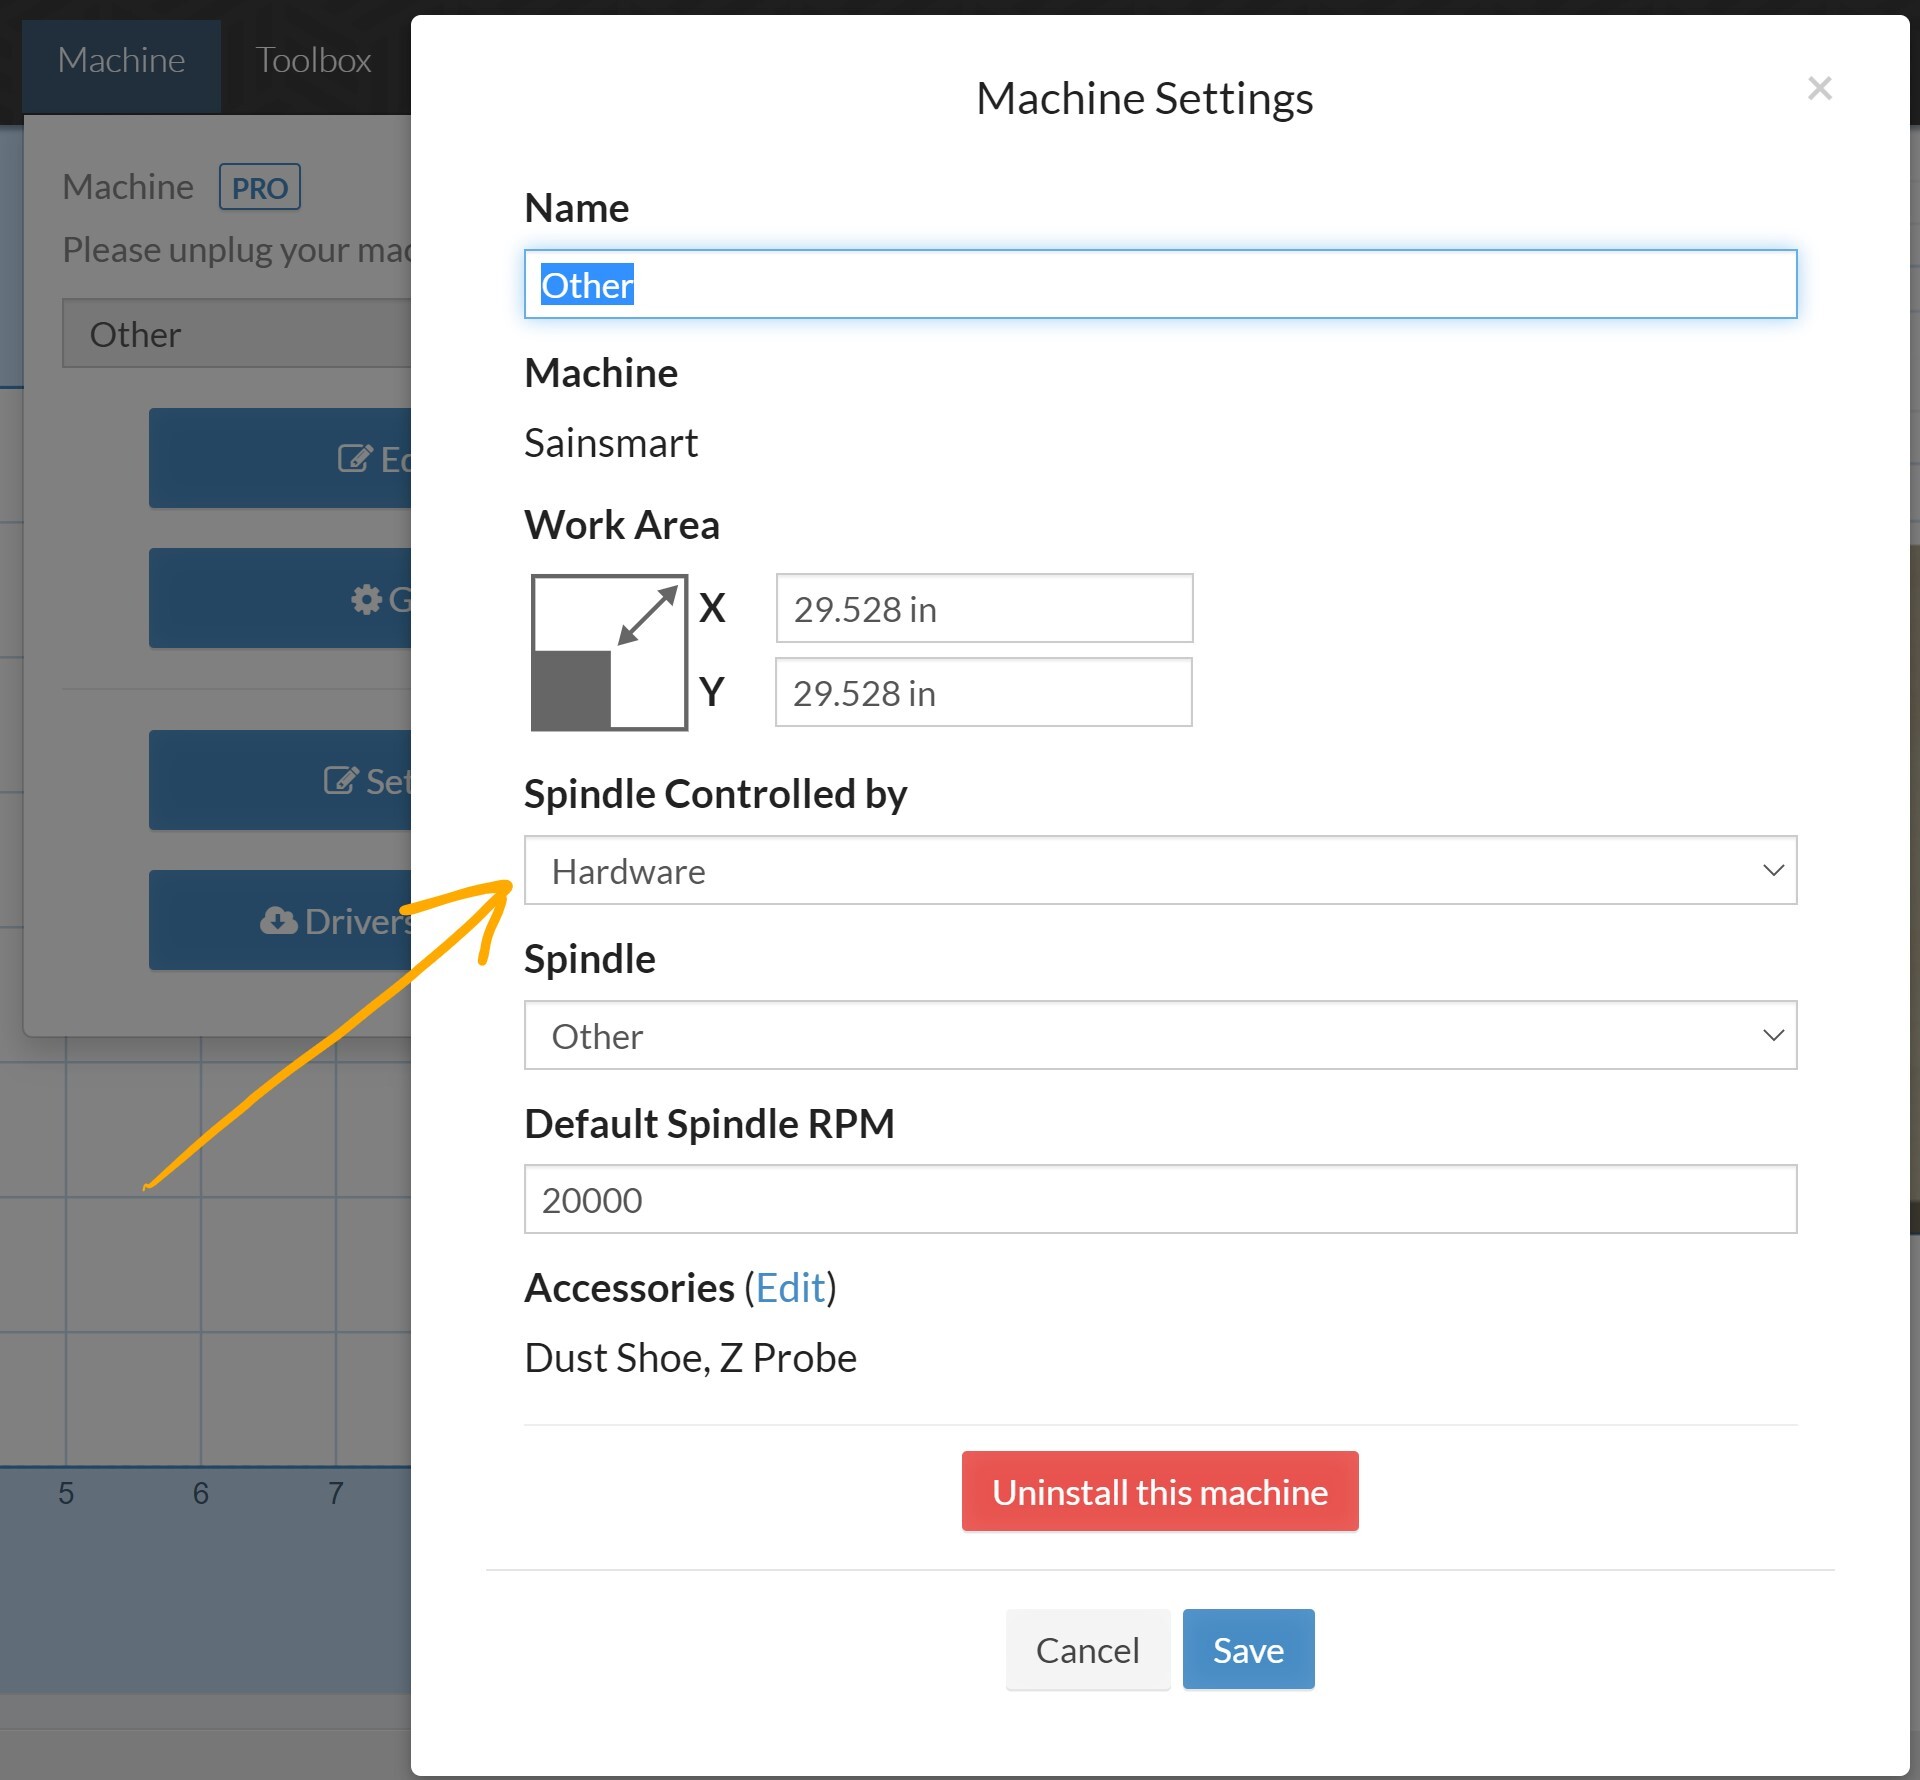
If it still doesn’t work, you can go to “Machine” > “Edit Machine” and change the spindle control to “Hardware”. The spindle should be set to “Other”, and the default spindle speed should be set to the speed value recommended by the manufacturer.
|
To test the spindle, follow these steps:
Once connected to Easel, you can test if the spindle is working properly through the machine inspector.
Before running these commands, make sure that you remove the bit or bit is safe.
To open the Machine Inspector, go to Machine > General Settings > Machine Inspector.
In the console, send the following command to unlock your machine:
$X
The console looks like this:
Next, send this command (this command will increase the spindle speed to 12000 RPM):
M3 S12000
Press Enter. Once run, use this command to close it:
M5
Press Enter.
If you use these commands to turn the spindle on and off, you will be able to run the engraving and expect the spindle to work as expected.
If this operation does not resolve the issue, it may be a hardware failure. For hardware issues, you need to contact the manufacturer for more support.
¶ Add Easel’s postprocessor to your Vectric software
If you want to design your 3D engraving project using a different CAD/CAM program, you can import the standard gcode file into Easel. This means you can use Easel to send gcode projects to your machine, even if you don’t use Easel to design your project. Vectric
Products (VCarve Pro, VCarve Desktop, Aspire, Cut2D and PhotoVCarve) have a special Easel postprocessor that allows you to send these files through Easel. We also have one more suitable On Autodesk Fusion360
To use your Vectric software with Easel, download the postprocessor from Easel by going to Import > Gcode > Vectric V-Carve, Aspire, Cut2D. Click the link to download the “vectric-easel.pp” file. After downloading, you need to install the postprocessor into your Vectric program.
We recommend that you watch Joe P. Krcma’s video tutorial on how to add an Easel postprocessor to these programs.
Note: For Aspire, VCarve Pro, and VCarve Desktop, you can also install the postprocessor by going to the file > within the software “Open Application Data Folder…”.
¶ Install Fusion 360 Postprocessor
Follow the steps below to install and use the Fusion 360 postprocessor.
Make sure you can download and save the postprocessor to your computer. Postprocessors can be found here
Open the Post Library from the Admin menu.

|
Import the postprocessor into the required libraries:
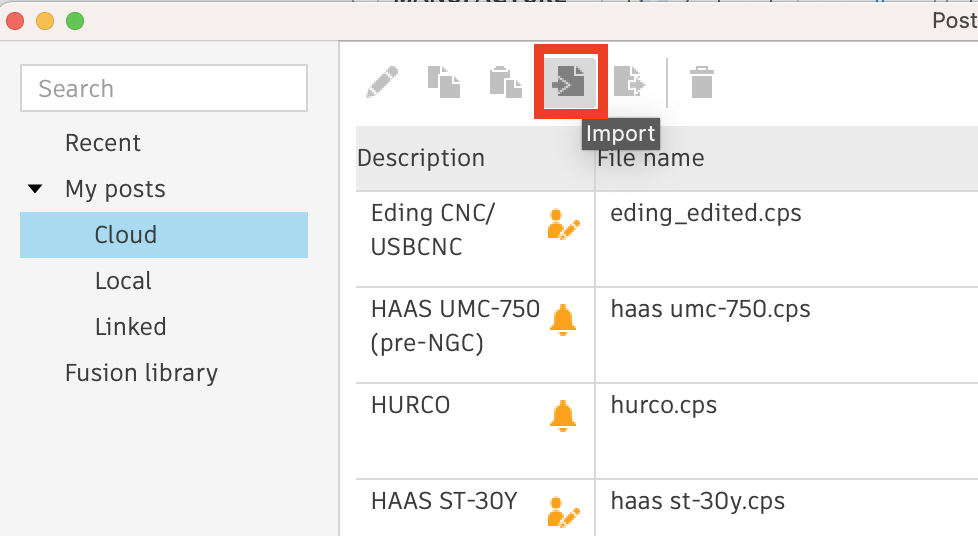
|
Now that you have done this, whenever you complete a manufacturing operation in Fusion 360, the Post Processing dialog has a source option for My Cloud Posts, which allows you to use any postprocessor that has been uploaded to the CAMPosts folder. It may take a while to appear.
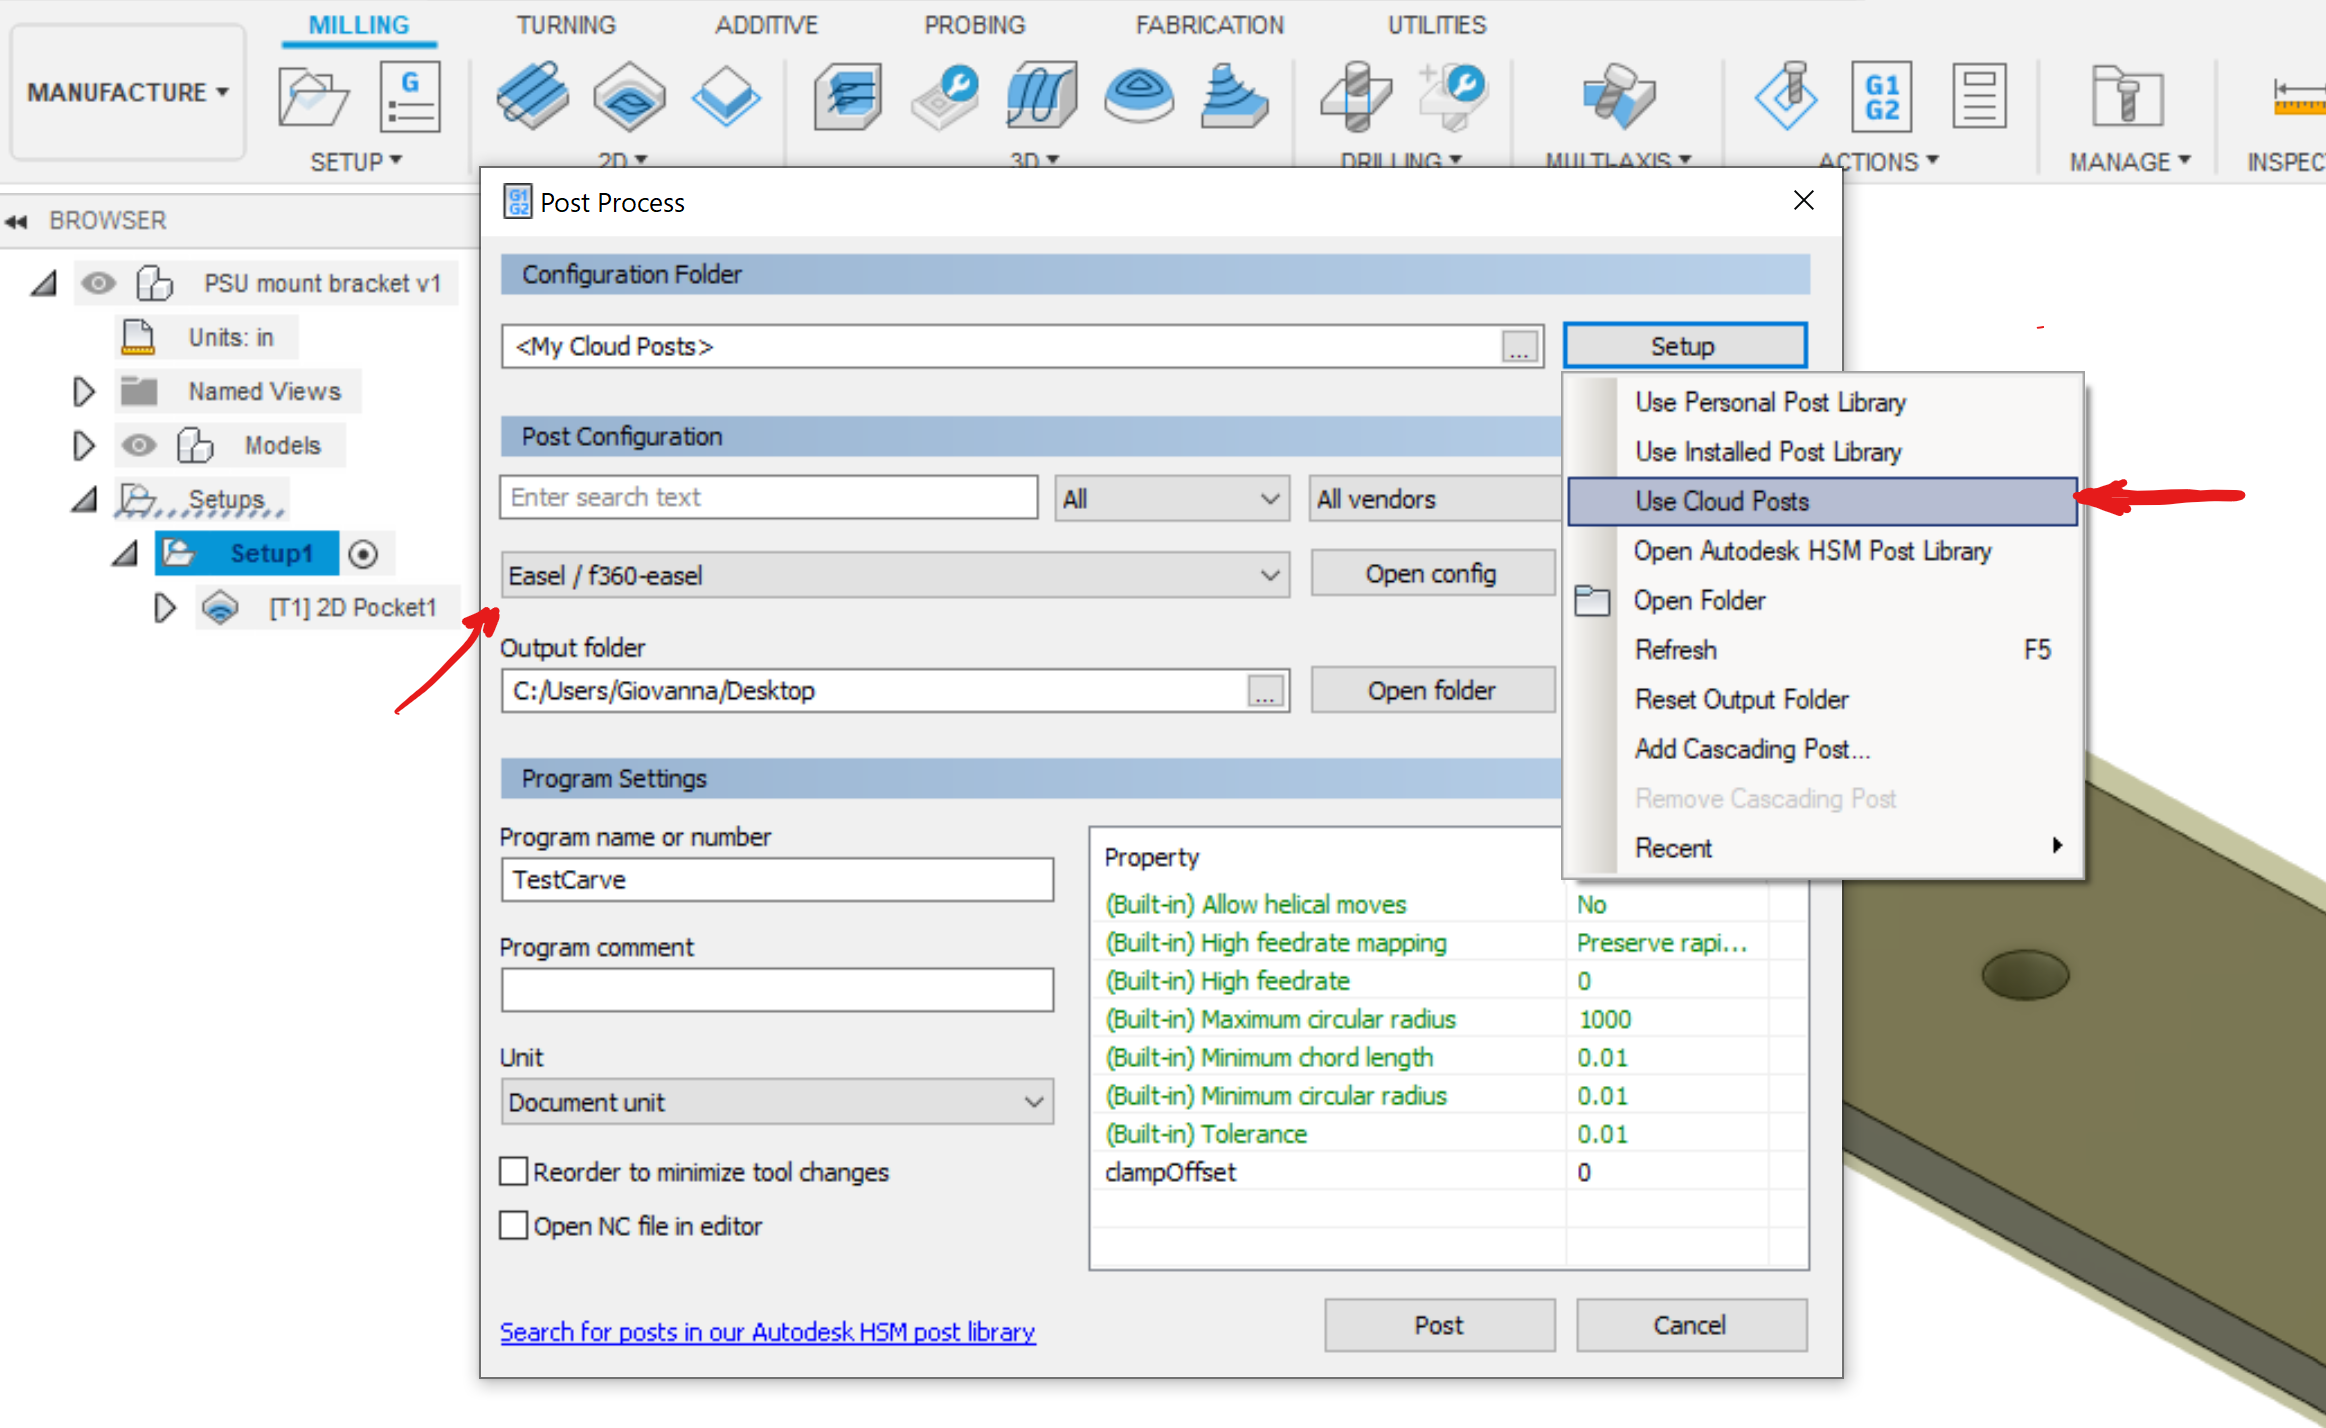
|
¶ Use MeshCAM with Easel
MeshCAM specializes in generating toolpaths from 3D (STL) models. You can easily import the toolpaths created by MeshCAM into Easel and send to your 3D engraver. Here is what you need to know about using MeshCAM with Easel.
content
Use the right post-processor
Export one tool path at a time
Set the correct material size
Preparing G code for export
¶ 1.Use the correct postprocessor
Easel can import and send G codes created by MeshCAM. You don’t need to download any special postprocessors, and a postprocessor named Basic_Gcode-Inch will work properly.
¶ 2. Export one toolpath at a time
You must export the path to each tool individually. For example, if you use rough drill bits and ball head finishing drill bits, you must export them separately.
¶ 3.Set the correct material size
It is crucial to accurately size the material. If you are using Carvey, remember that the toolpath must avoid smart fixtures, so it is important to create a stock size larger than the model and move the model away from the bottom left corner of the inventory.
¶ Prepare to import g code from MeshCAM to Easel
Here is how to prepare g code in MeshCAM to import Easel. 1
. . Make sure to set inventory sizes to accurately reflect your material. 2
. Make sure the origin is set to the lower left corner of the material and Z is located on the stock surface
3. Use the Basic G Code (Inches) option to export the g code.
You can then import the g code into Easel, go to the project drop-down menu and select “Import G Code”.